Quick start manual for the A320
The starting of an airliner is not easy and must be done in pairs. The procedures are shared between the pilots and are different whether it is the first flight of the day or the following ones.
This tutorial only mentioned the essentials, for us lovers of flight simulation, to start the A320, from the beginning to the arrival at the destination parking.
Everything is not there but the essential is and the procedures can be done alone (the C/L check must be done in pairs for example).
If you follow this tutorial you will enjoy flying on a plane which is today one of the most popular, or maybe the most popular, in the world.
Enjoy your flight
Starting of the engines
- Batteries on ON. If night, turn on the panels (DOME) and the dashboard (OVHD INTL LT)
- Have a GPU plugged
- EXT PWR on ON
- NB: scrolling of the upper panel from up to down and left to right
- IRS: the 3 on NAV
- Test of the fire alarms: APU ENG1 and ENG2 (SQUIB, DISCH and FIRE turned on)
- Put the 6 pumps FUEL on ON (lights turned off)
- Put PACK1 and PACK2 on ON (lights turned off)
- Put STROBE on AUTO, NAV&LOGO on ON
- No SMOKING on ON
- EMER EXIT on ARM
-
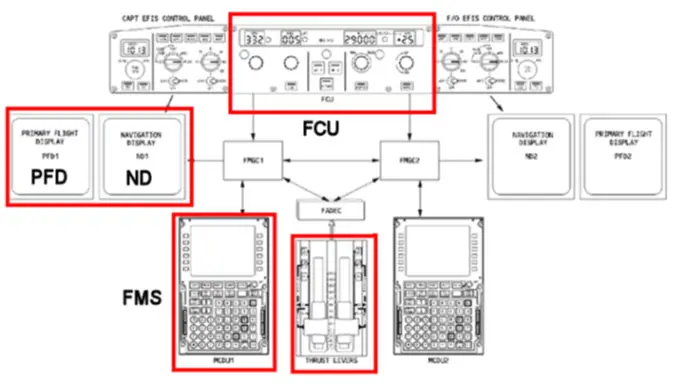
How to load a flight plan into the A320 FMS - see the specific page
- Set the departure QNH in the FCU
- Set the initial altitude (VAC & eAIP)
- CSTR on ON
-
Briefing and Check/List (C/L) "Before starting" (C/L part 1)
- Starting of the APU (Master Swith then START on ON): check on the central screen. When AVAIL, turn off the GPU
- APU BLEED on ON
- Check the doors and jetways
- BEACON on ON
- Throttle on IDLE, BRAKE PARK on ON
- Transponder on AUTO
-
C/L part 2 of "Before starting"
- ENG MODE on START
- Starting of the engine 2 (ENG2 up). Check on the lower central screen (N1=20 – EGT=330 – N2=64)
- Starting of the engine 1 (ENG1 up). Check on the lower central screen (N1=20 – EGT=330 – N2=64)
- ENG MODE on NORM
- Turn off the APU (MASTER SW turned off) and APU BLEED (off)
- SPOILER on ARM (up)
- FLAPS on 1 or 2 following the value set in the FMS
-
C/L "After starting"
- RWY TURN OFF sur ON, NOSE sur TAXI
-
Taxiway
- At the parking point: RADAR on ON, TILT on 4°, AUTO BRAKE on MAX
- Aligned: LAND on ON, NOSE on T.O., TCAS on TA/RA and hide the VOR display
-
C/L "Before take-off"
Take-off
- THROTTLE on FLEX or TOGA depending on what has been set on the PERF screen of the FMS
-
Initial climbing:
- Variometer >0 => gears up
- Put the AP1 or AP2 on ON (at 100 ft or after 5 sec)
- When LVR CLIMB is flashing on the PFD, put the throttle on CLIMB
- When the letters F and/or S appears on the PFD, put the flaps in the lower position (2->1 and :or 1->0)
- Turn off the front lights TURN OFF and NOSE
- Disarm the SPOILERS
- Do ON-OFF on SIGNS to "free" the flight attendants
- When the QNH is flashing on the PFD, go to STD on the FCU
-
C/L after take-off
- Before reaching the altitude level displayed on the FCU, set the cruise altitude (or the altitude given by the control) and pull (OPEN CLIMB mode) or push (CLIMB mode) on the button of the FCU
- At FL100 turn off LAND and SIGNS to "free" the passengers
- Before the end of the cruse, set in the FMS, page PERF-APPR, the information of the arrival airport (weather info)
- About xx NM from the arrival, start to descent by displaying the altitude given by the control to the FCU and pull (OPEN DESC mode) or push (DESC mode) [xx = at least (FL cruise -100)/4 + (FL100 – last level)/3. Ex: Cruise 340, last level 4000' at (340-100)/4 + (100-4)/3 equals 75 NM
- AUTO BRK on LOW or MED
- While passing FL100 in descent, LAND on ON and ILS on ON (FCU)
- When STD is flashing on the PFD, go to the QNH of the arrival airport
-
C/L approach
- When the 2 diamonds of the ILS are visible on the PFD, set APPR on ON (FCU)
- The activation of the "approach" mode is done automatically when the letter D in the circle appears in the PFD or by activating it on the PERF APPR page of the FMS
- Continue the descent to the last level (following the information of the airport)
- Set the 2nd AP on ON
- Release the flaps progressively until FULL by respecting the limit speeds (displayed on the dashboard)
- Around 2000 ft, gears down and turn on the lights TURN OFF and set NOSE on Taxi
-
C/L before landing
-
Landing
- At 200 ft disable the AP and let the place land
- When the wheels touch the ground, set the REVERSES, and if needed THROTTLE on MAX (short runway) and slow down.
- At 70 kts REVERSE on IDLE
- At the taxi speed (30 kts), REVERSES off, radar MTO and PWS turned off
- Cleared runway, STROBES on OFF, LAND on OFF, disarm Spoilers, flaps at 0, TCAS on STBY, start APU.
-
C/L after landing
- Go to the parking
- Last turn before the parking point, turn off the front lights, APU BLEED on ON
- Once stopped, turn off the two engines and the anti-collision system, tank pumps on OFF, SIGNS on OFF, transponder on OFF.
- Have the GPU plugged
- Turn off the APU
-
C/L parking