Managing addons with MSFS Addons Linker
TABLE OF CONTENTS
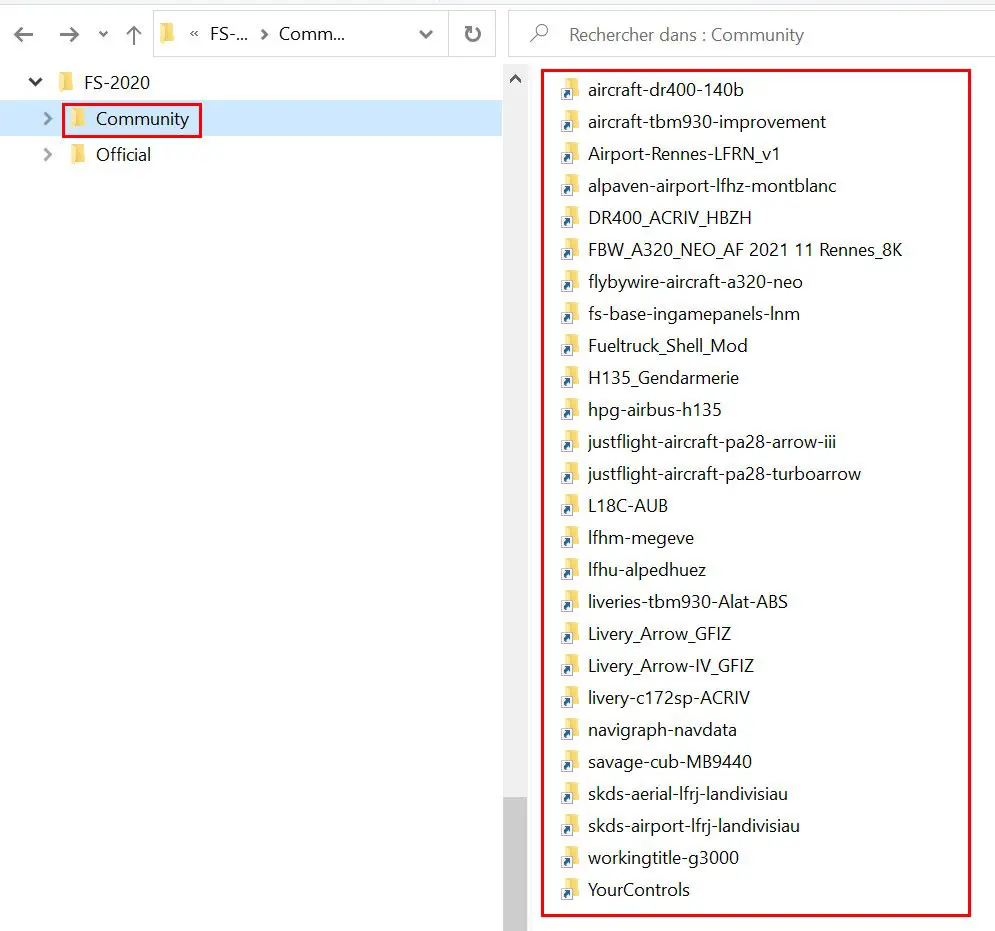
The Community folder which contains all the sceneries, airports, planes, modules added to MSFS, can quickly become very complicated to manage because there is no tree structure possible to classify the loaded elements.
There are several programs that manage the "add-ons" of the Community folder.
This tutorial introduces the free software "MSFS addons Linker".
1. Installation
- Download the software "MSFS_Addons_Linker_v11_ywFSX.zip" on the developer's website (link above) or on flightsim.to :
- Once the folder has been unzipped and the product installed on the disk of your choice (C: or another, not necessarily on the disk that contains MSFS), you must create the directory and the subfolders who will receive the addons.
This directory can be created in the "MSFS_Addons_Linker_v11_ywFSX" folder (example below) or elsewhere, or even on another disk. The name is your choice.
You must also search in "MSFS_Addons_Linker_v11_ywFSX " the file "MSFS_AddonsLinker.exe" and create a shortcut to put on the Windows desktop.
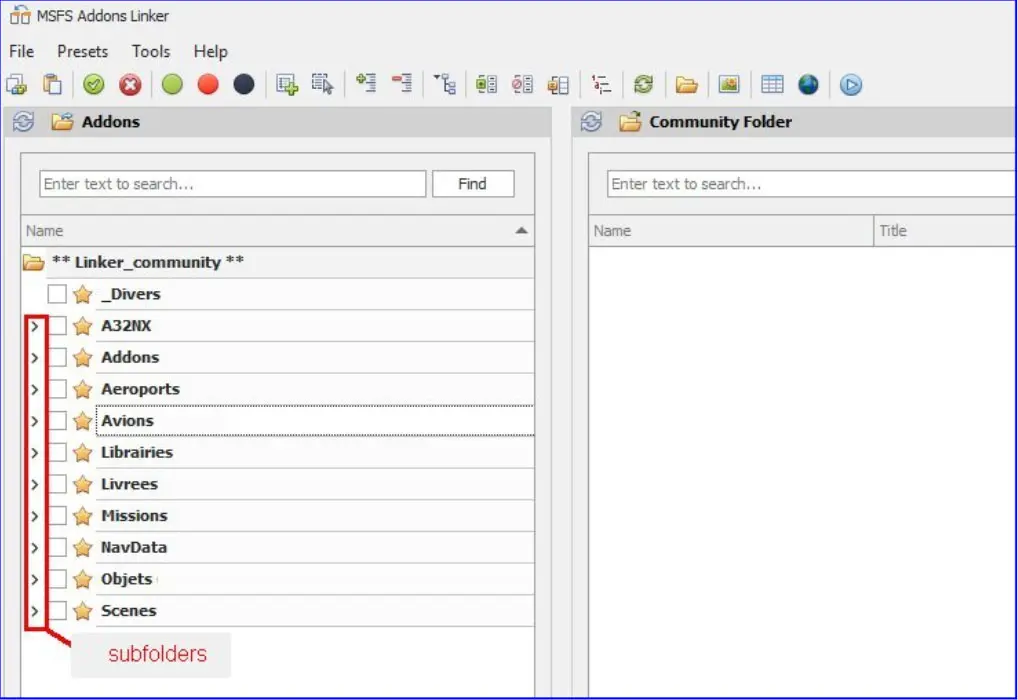
Below, example, with a directory named "Linker_community" with a first level of sub-folders to classify the addons:
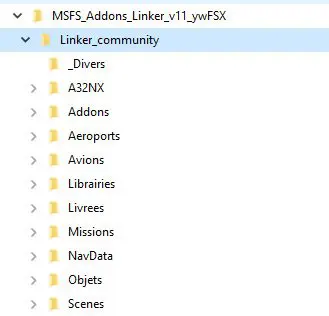
You can of course choose the names of subfolders that suit you well and each subfolder can also contain a tree of subfolders:

You must then click on the Linker shortcut to launch the program that opens, the first time in a "Options" window.
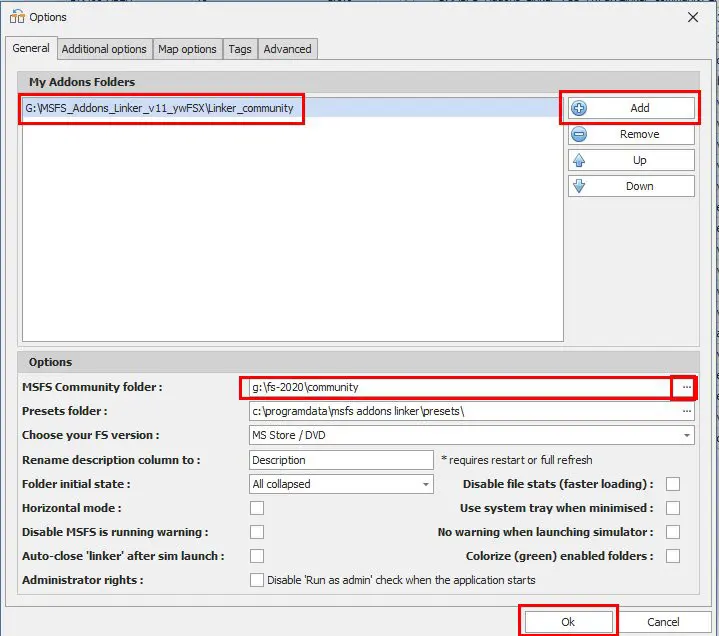
In this window, if it is not pre-filled (you must then check the links), you must select the directory created previously which will contain all the addons and indicate where the Community directory of FS2020 is located.
After pressing OK, the user window opens and you can check the tree structure of your directory and its subfolders. Example:
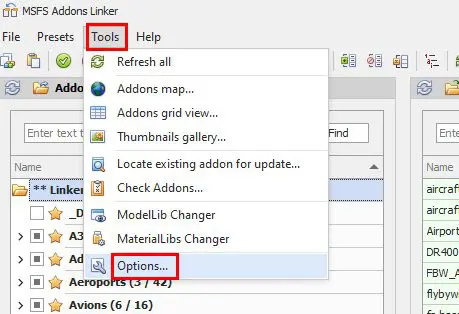
NB: you can always come back and modify the options from the "Tools then Options" menu:
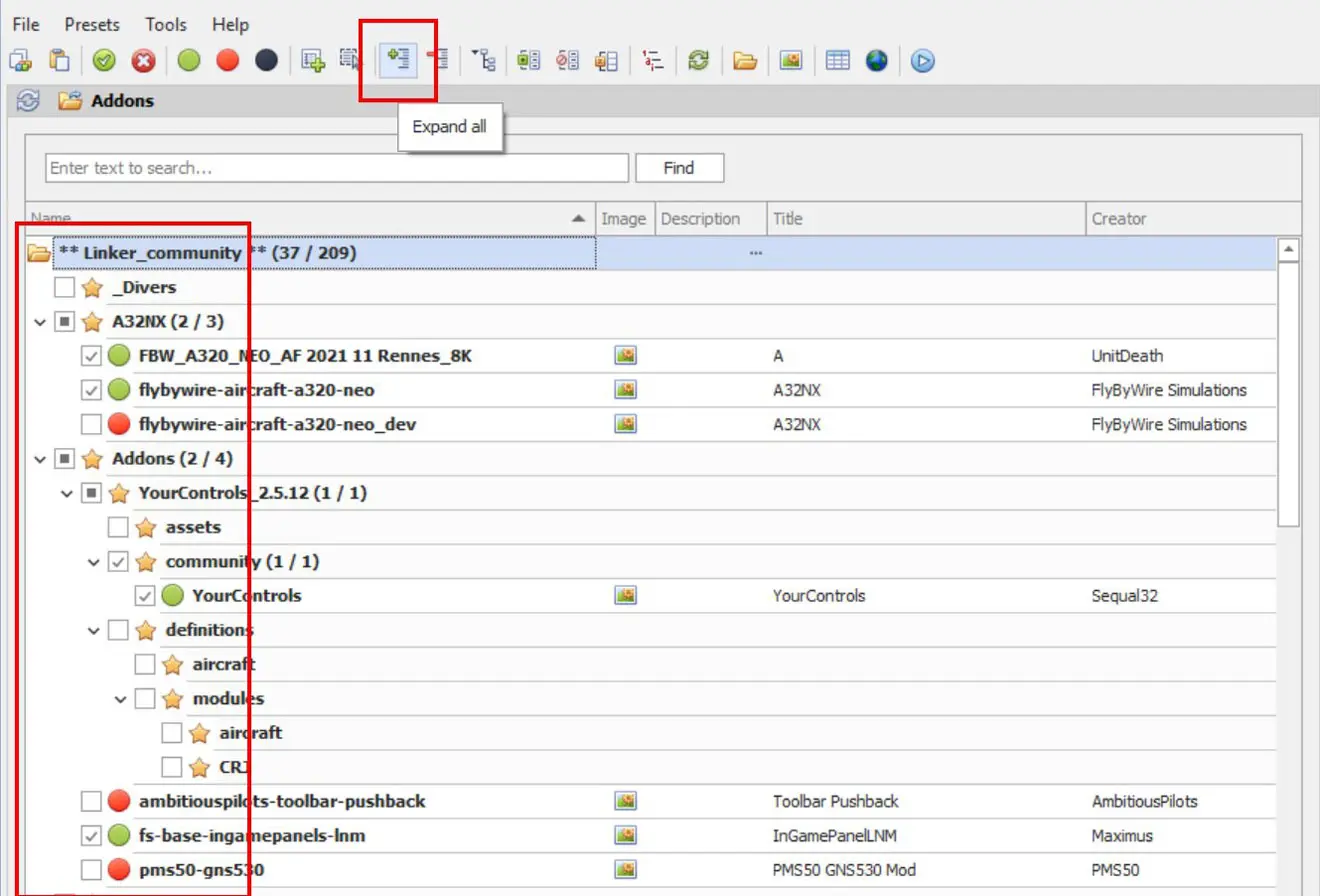
There are two handy buttons, in the upper base of the menus, which allow you to expand or collapse the folder / file trees:
Expand all
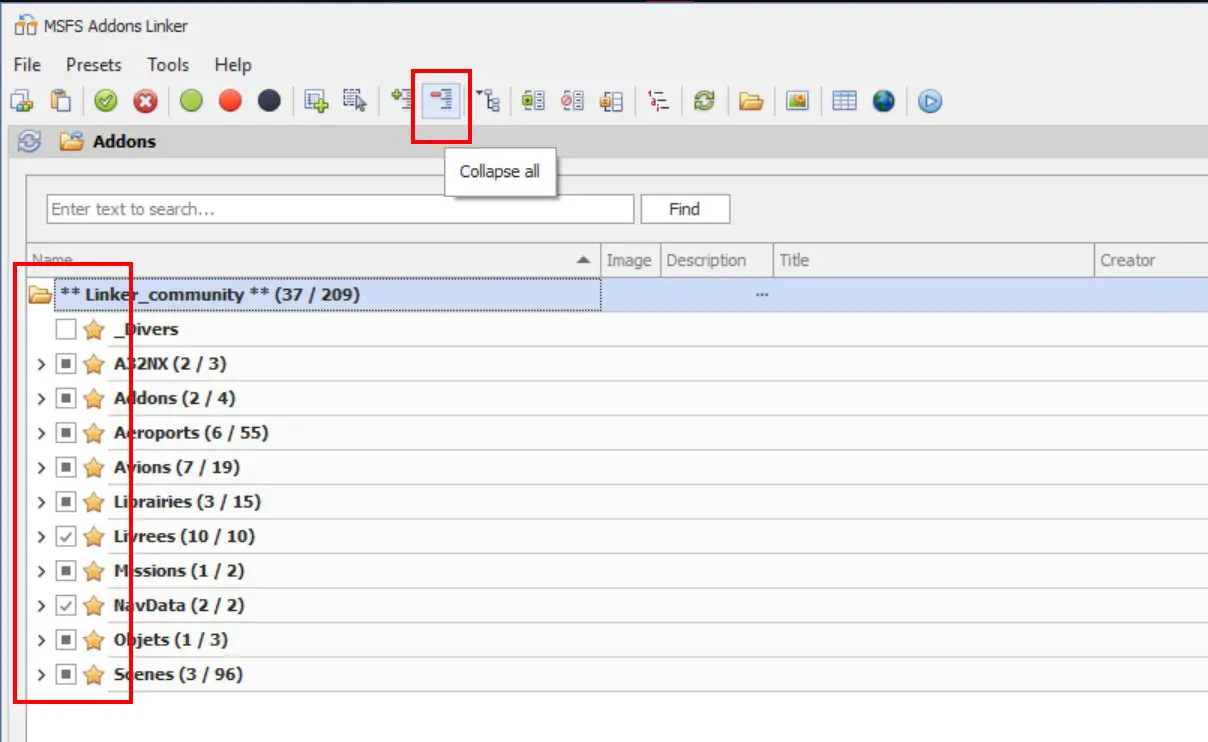
Collapse all
2. Use
To use MSFS Addons Linker (diminutive " Linker " in this tutorial), you must store the addons in the directory created previously (Linker_Community in our example). It is Linker which will take care of creating links in the Community folder of MSFS, there will never be any duplication of files .
Many sites provide free addons, like flightsim.to and simvol.org (ours). Others are chargeable, but the process is the same.
WARNING: some addons are done by an installer which, implicitly, puts the module in the Community folder and therefore does not go through Linker. This is the case for the Airbus A32NX and for the pilot module with two "Your Controls". But it is possible to configure them so that they create their files in the Linker addons directory.
The downloaded addons are in zipped format and you have to decompress them and only take the folder (or files) containing the files needed by MSFS to store it in Linker.
For those who are just starting out, it will be quick, for those who already have a large number of addons, the tidying up will be more important.
WARNING: it is Linker which creates the links in Community, it must therefore be empty at the start: save its content elsewhere.
-
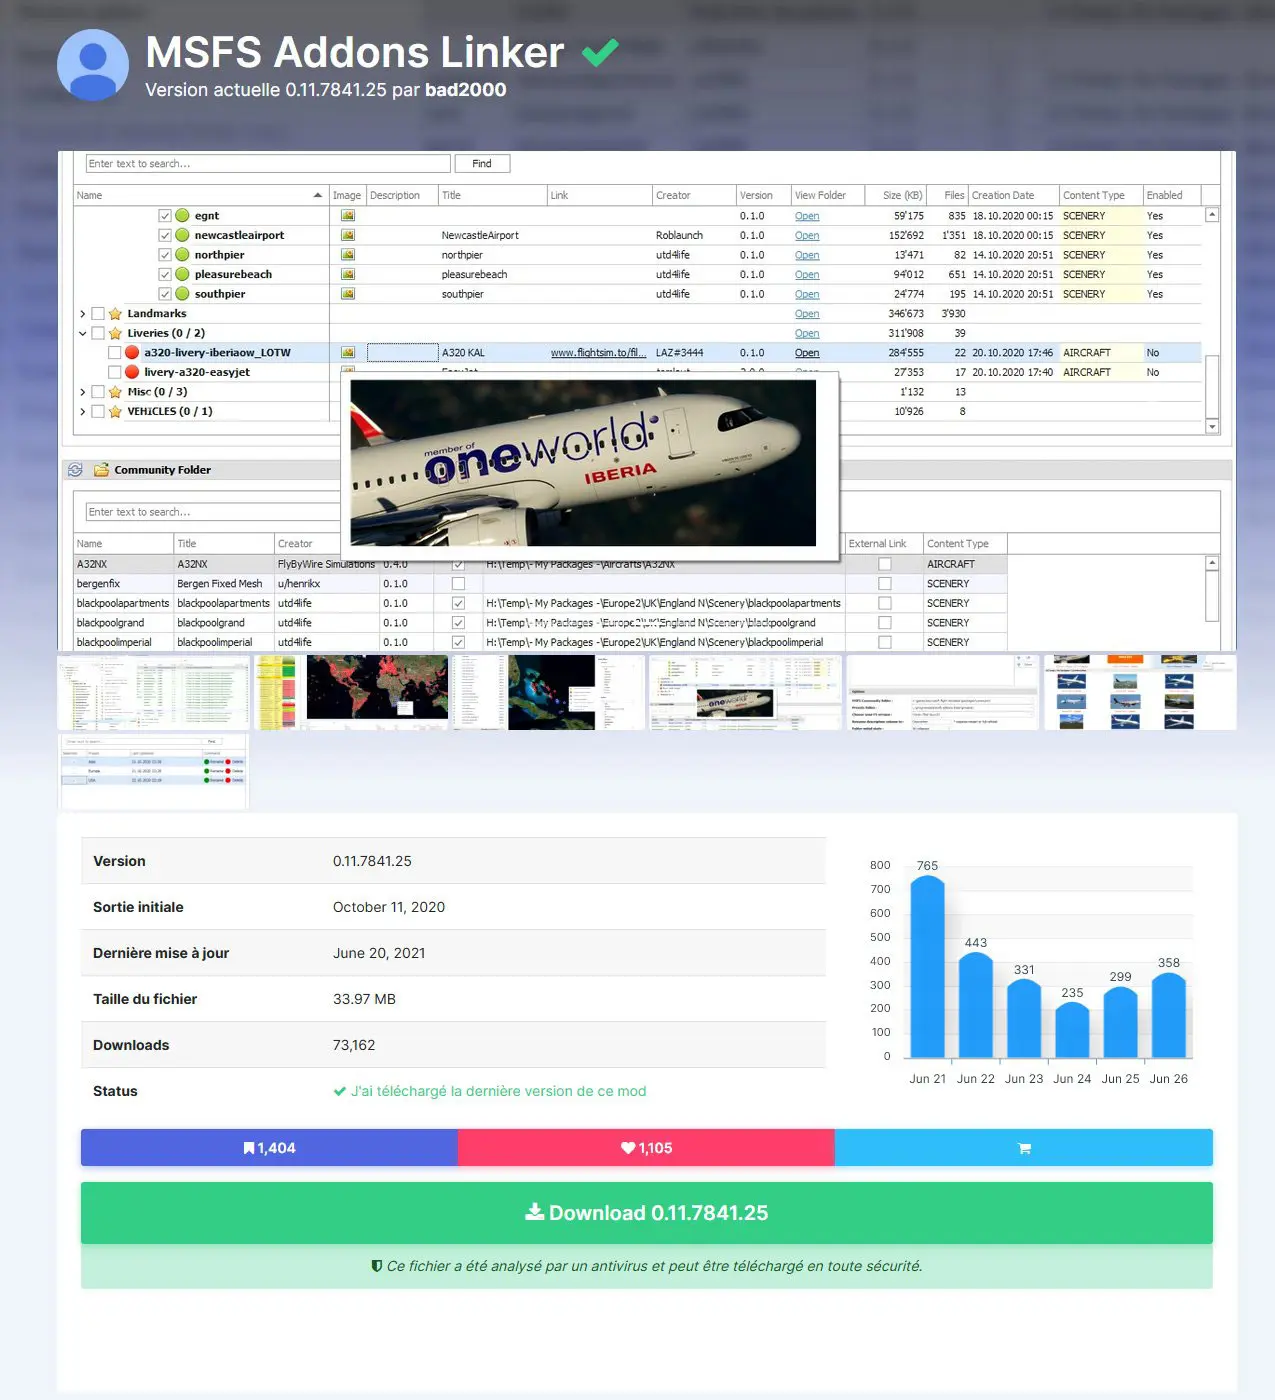
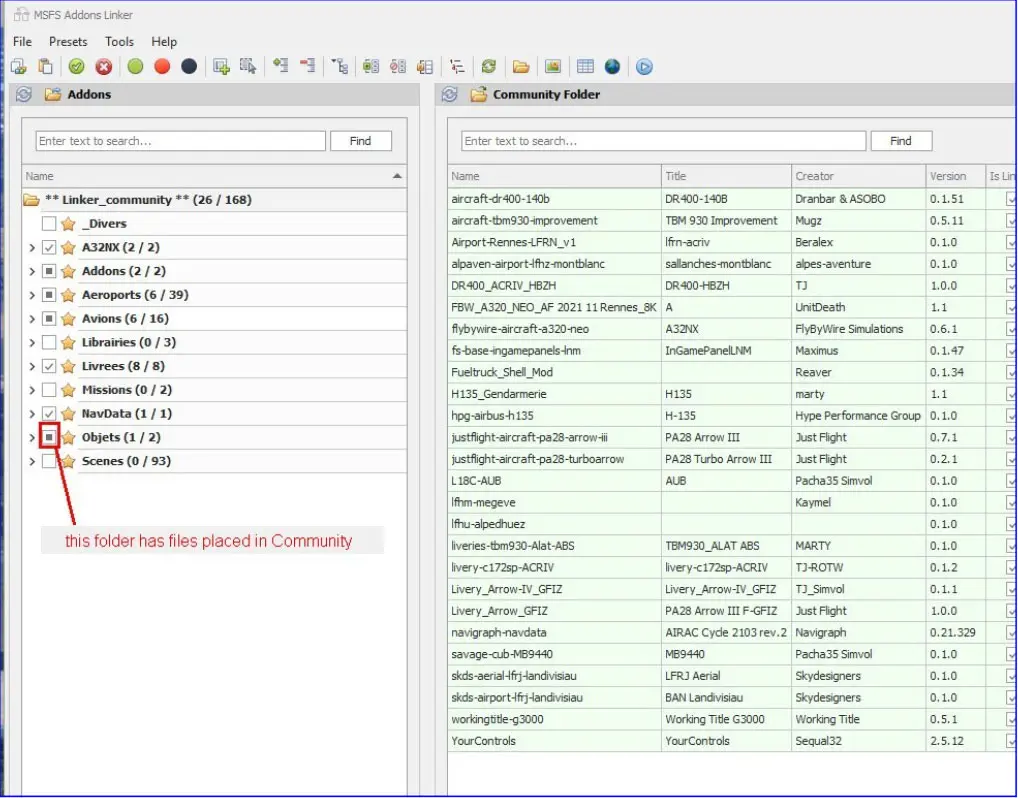
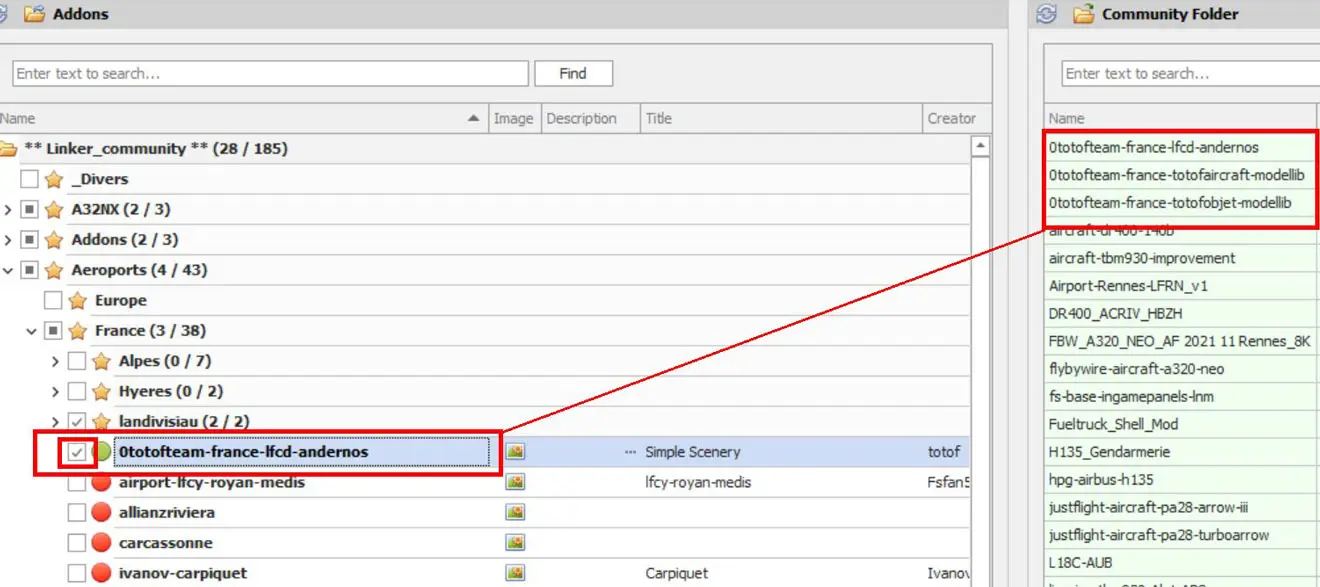
After installation, Linker opens with a two-part window:
- on the left, the tree structure and its content
- on the right, the contents of the Community folder
Example with addons already loaded and an "unfolded" tree structure:
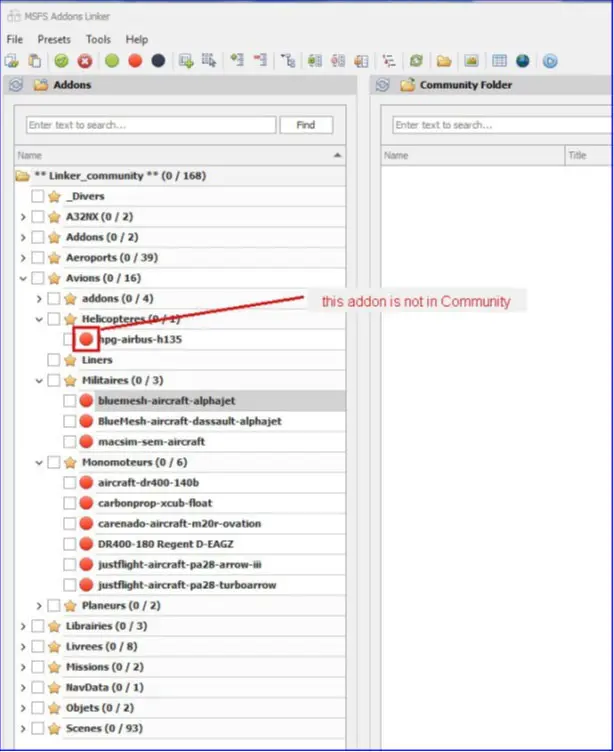
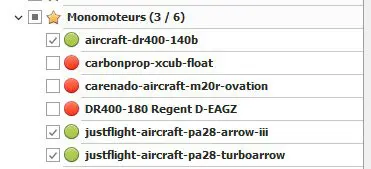
Addons not present in Community are preceded by a red circle.
The addons that we want to see present in Community will be preceded by a green circle.
The interest of this software is to put in Community only what is necessary for its flight (planes, regions, etc ...).
However, there are addons that we use all the time and therefore must always be in Community.
-
Two possibilities :
- place them directly in Community without listing them in Linker
- put them in Linker and create a "Preset" which contains only these addons (see the creation of a preset below)
Example of minimum "Community" (everyone puts what they want):
We can then create other "Presets" which take all or part of the basic one and add other addons:
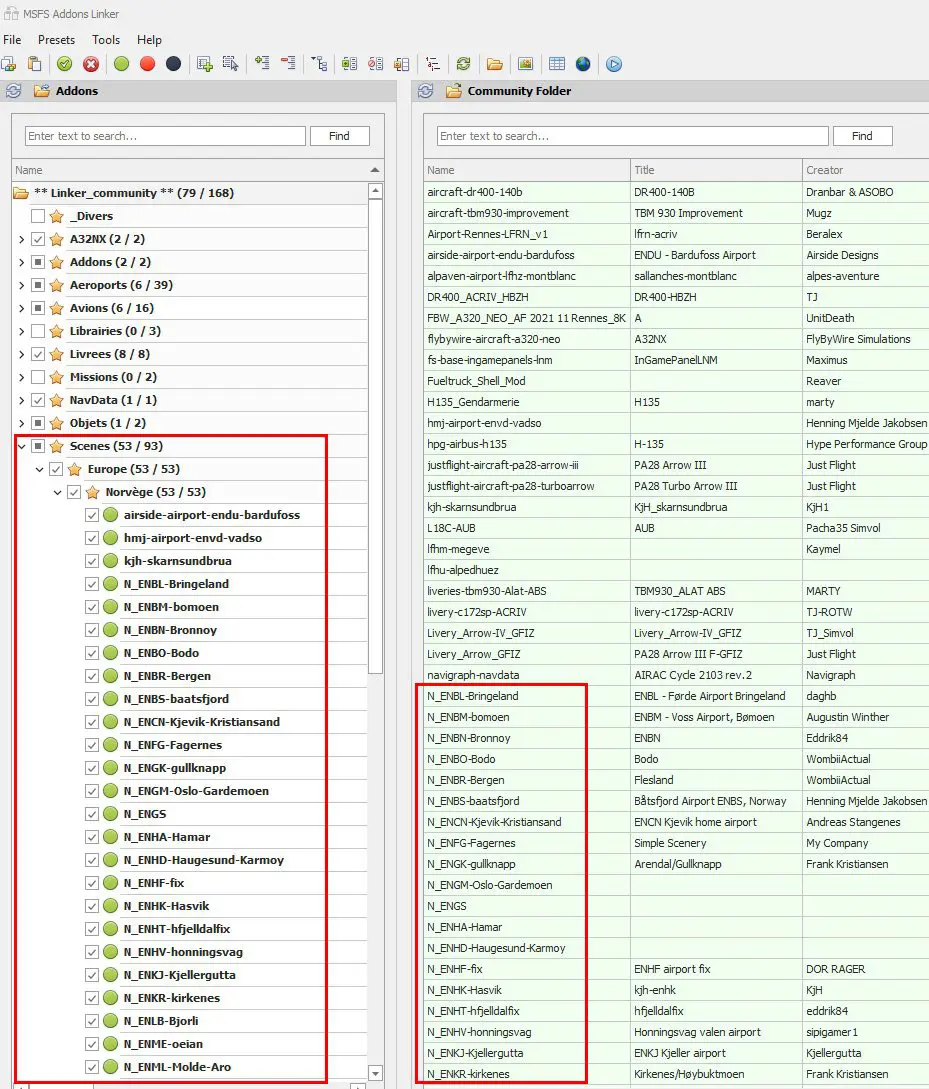
Example: adding "Norway" scenes:
- sceneries in Linker but not yet in Community
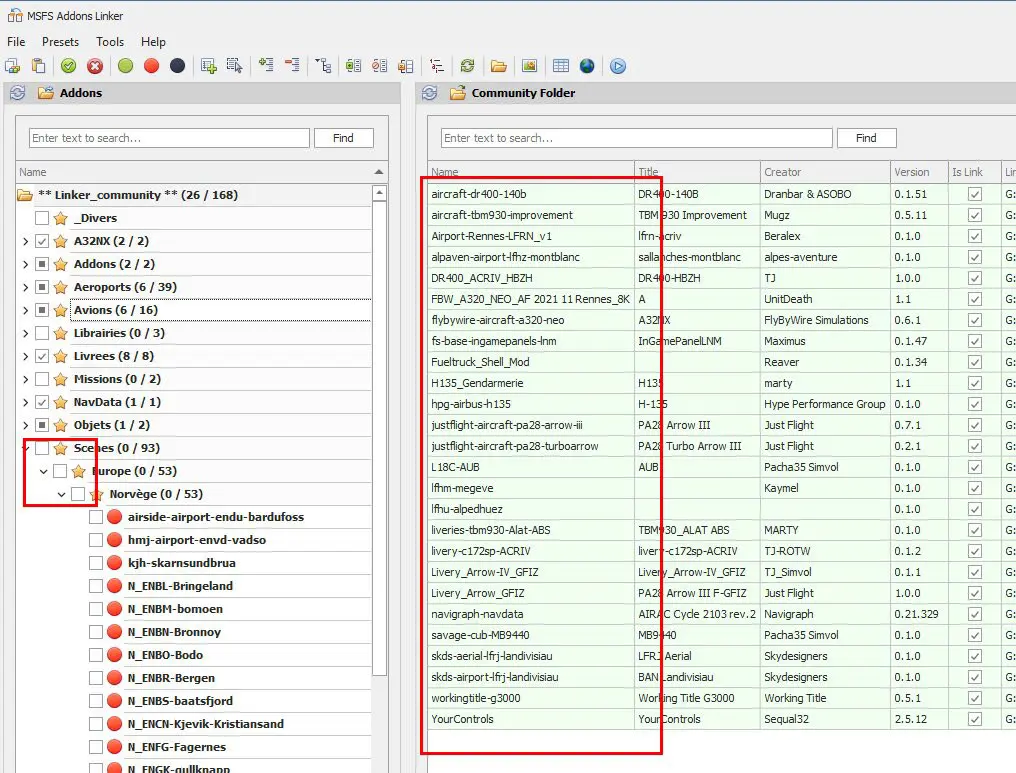
- sceneries added to Community (by clicking on the white square to the left of the name of either the folder or each file)
Of course, if we had to select each time what should go in Community, it would not be practical.
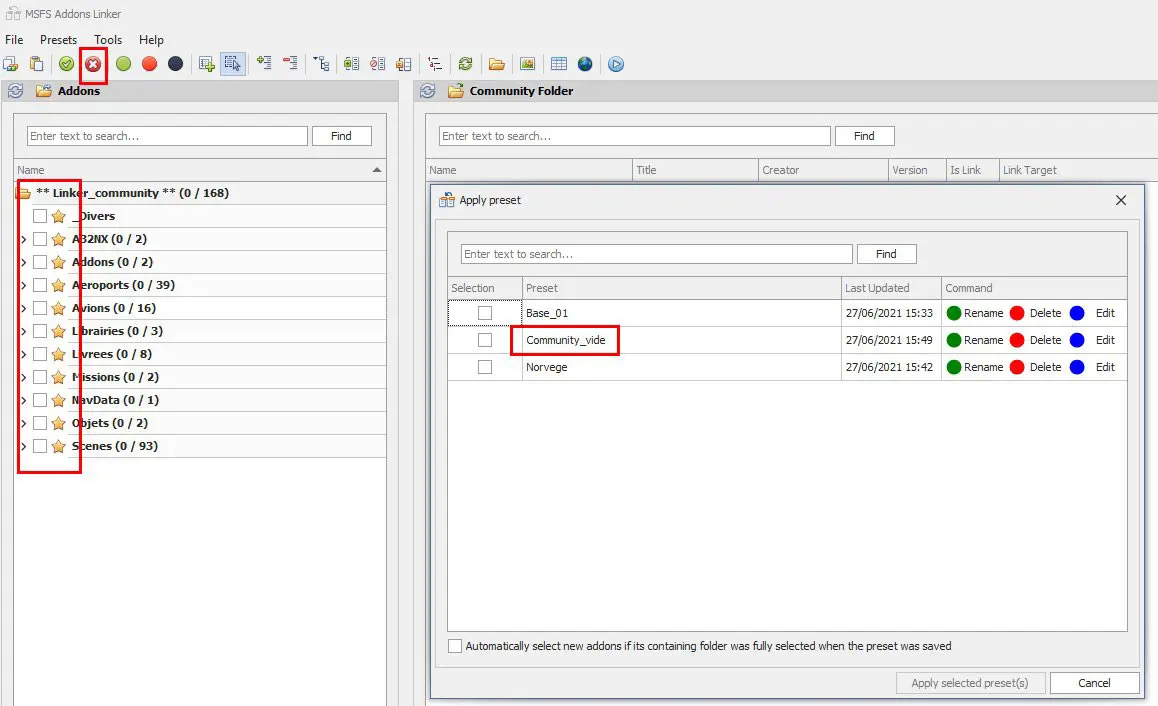
Linker therefore uses "Presets" which are pre-recorded situations allowing a single click to store all the content in Community by replacing the existing one (remember, these are only links).
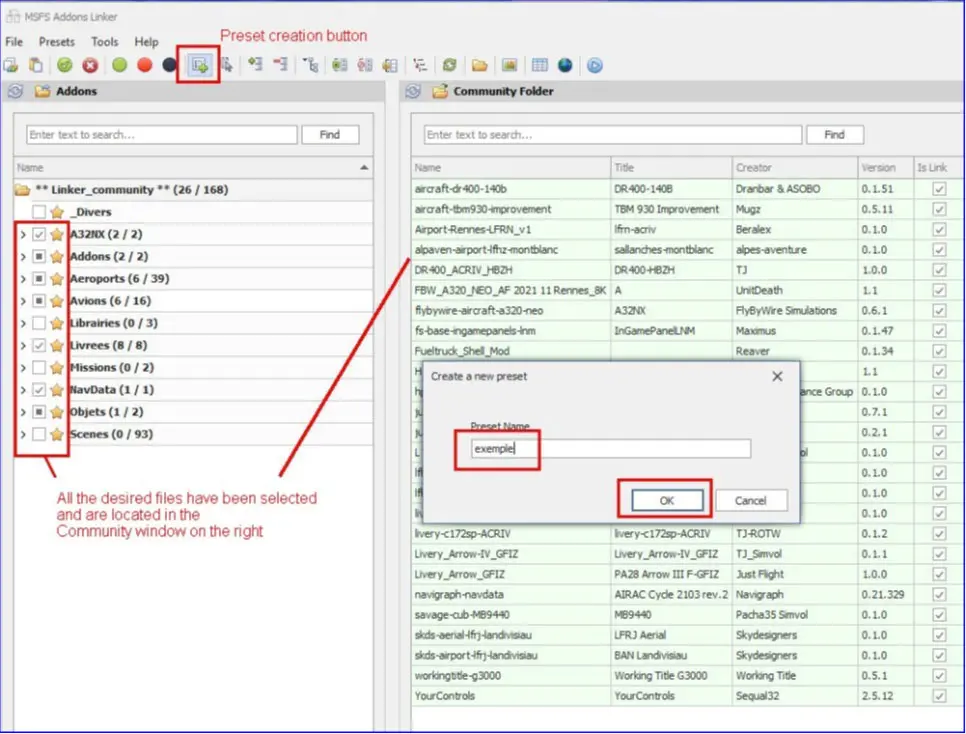
Example of creating a "preset"
You must first select all the files it must contain by changing them from red to green which puts them in Community.
You must then create the "preset" by clicking on the "create new preset" button.
Once OK validated, the preset is created and can be found in the preset selection window by clicking on the "Apply preset" button:
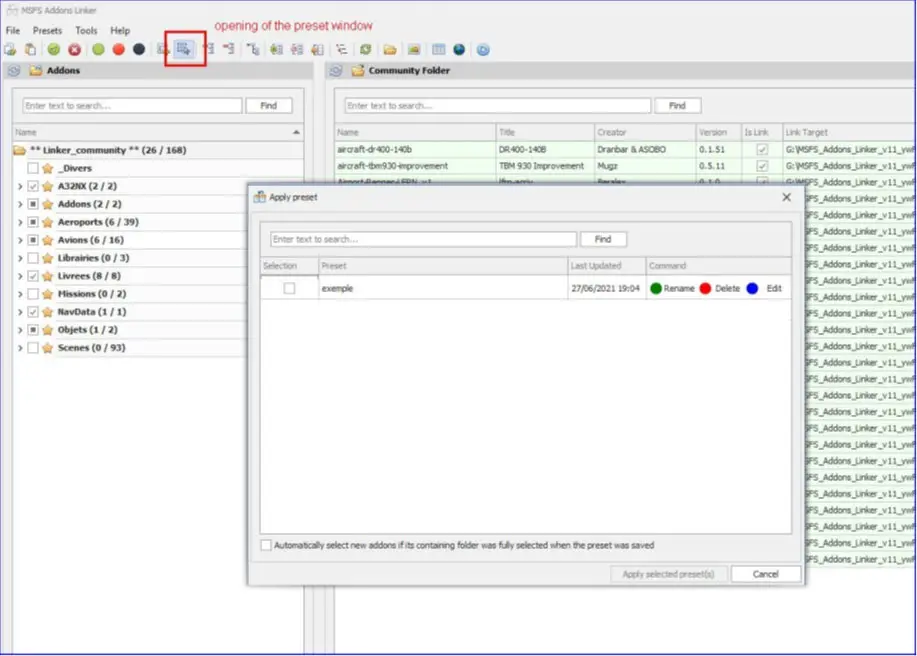
If you have created several flight environments with "preset", they will appear in this window and, by clicking on the square in front of the name and pressing OK, the addons replace the previous ones in the Community folder.
All this is very fast because, in the Community folder, the files are not copied, they are links to the files contained in Linker.
Case of an empty Community
During the updates of MSFS, it happened that the content of Community was corrupted or prevented the update.
It is recommended to only make updates with an empty Community.
We can therefore create an empty "preset" which will allow the MSFS update to be launched without risk.
To do this, you just have to deselect all the addons present and create the preset.
NB: it is prudent to create this preset before having put addons in Linker.
NB: this operation is not compulsory, it is just a security.
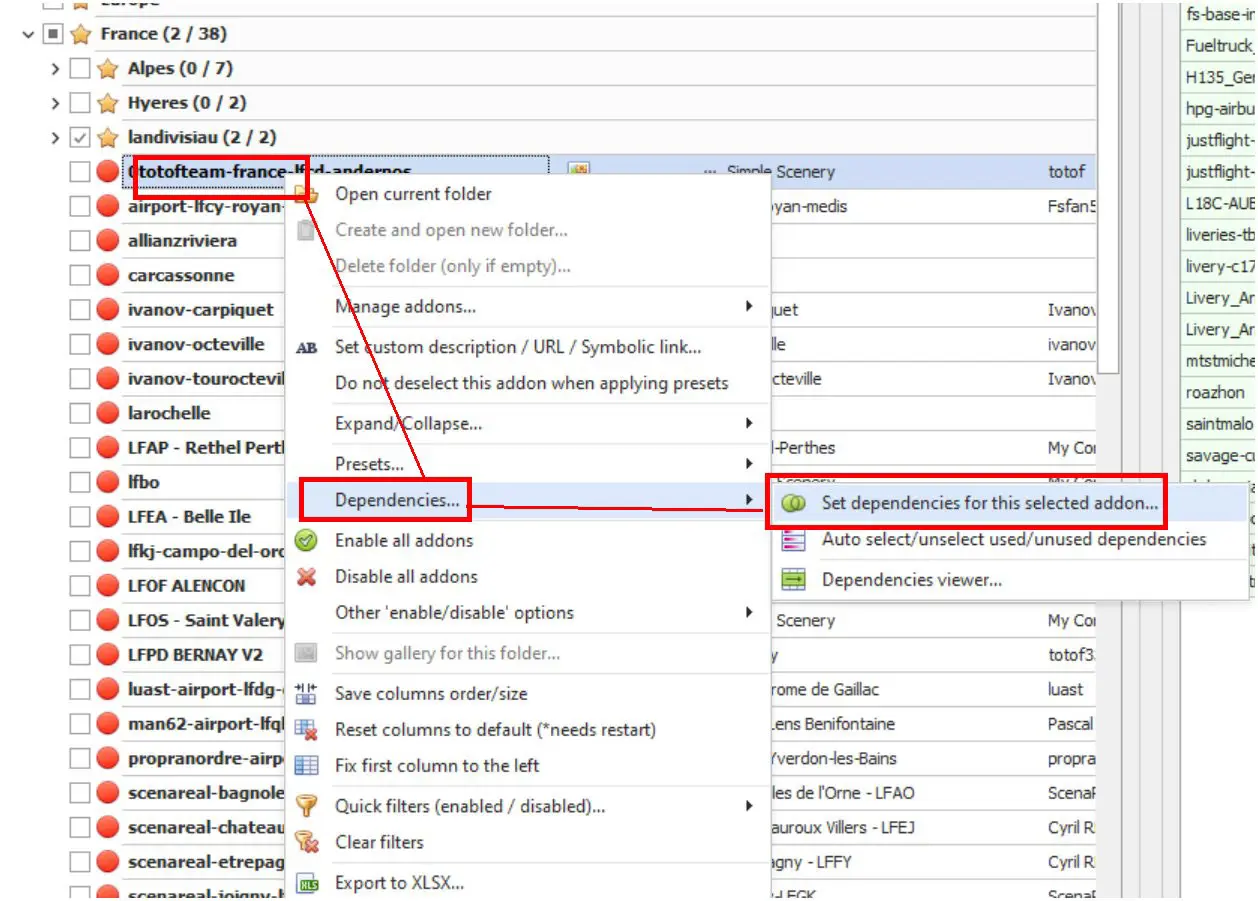
3. Manage dependencies
As in any simulator, some scenes or airports can use object libraries (libraries) that must of course be put in Community when you want to use the scene or the airport.
MSFS Addons Linker allows you to manage these dependencies very easily as soon as they are installed in its directory (in a "Libraries" subfolder for example).
In Linker, find the scene that uses libraries (indicated by the author) and right-click on it to open the access menu to the "Dependencies selection" window. Select "Set dependencies for this selected addon...".
In the dependency selection window, find in the appropriate folder the files that must be installed with the scene and select them.
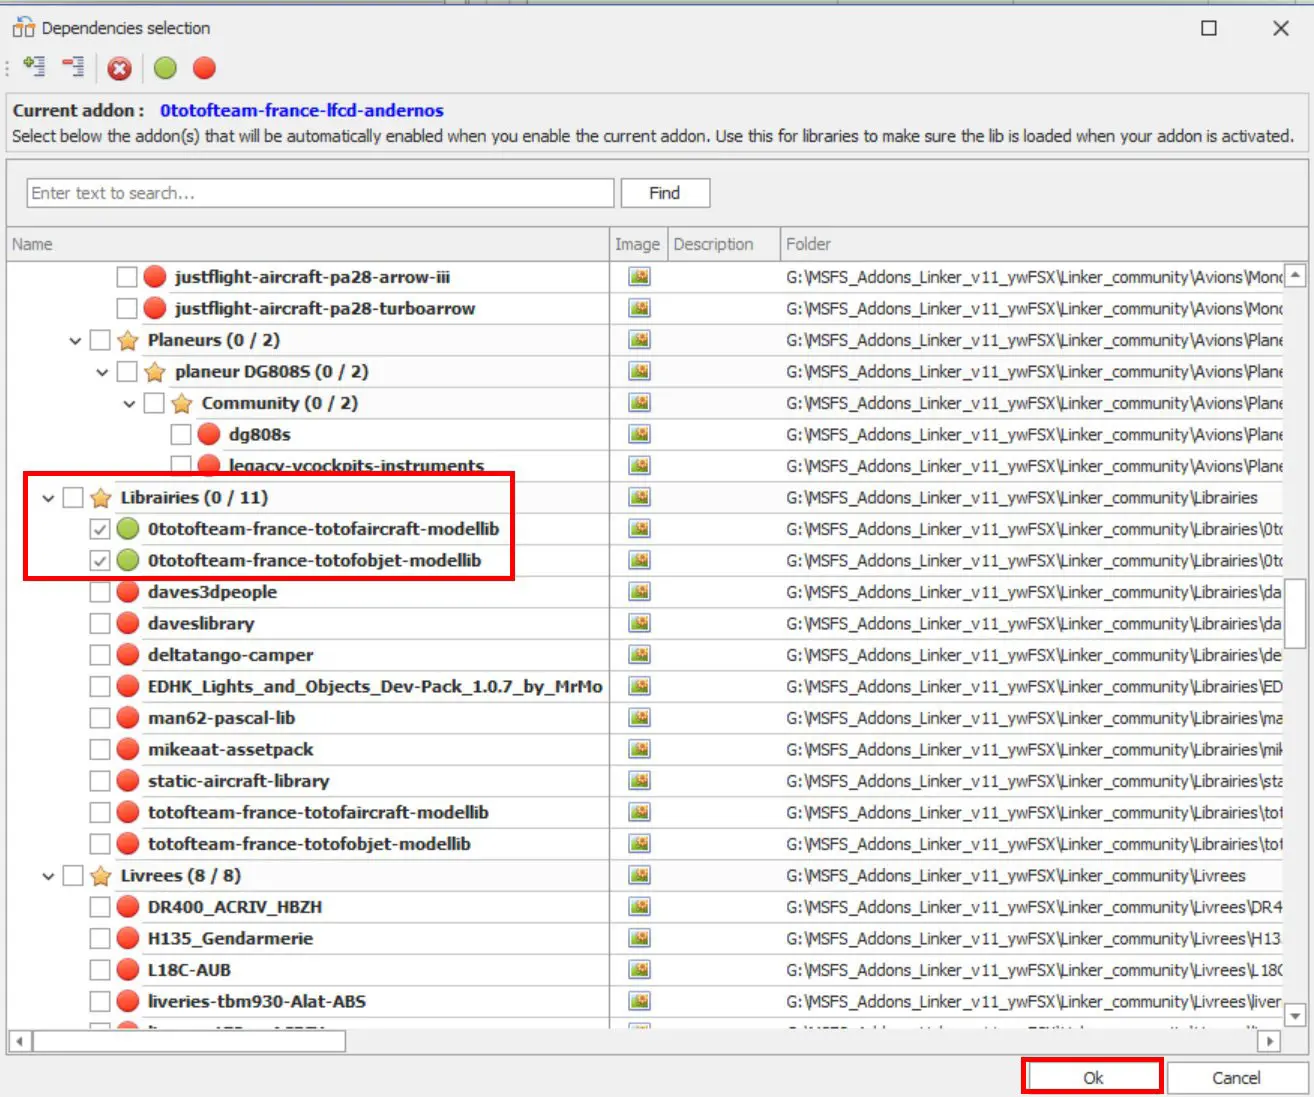
Click on OK and the relation is established, it will suffice to select the scene for it to be installed in Community with the dependent libraries.
4. Update of a "preset"
You may want to modify a "preset" (add or remove elements) without deleting it and creating another.
You can do this with the "edit" icon at the bottom of the element selection window.
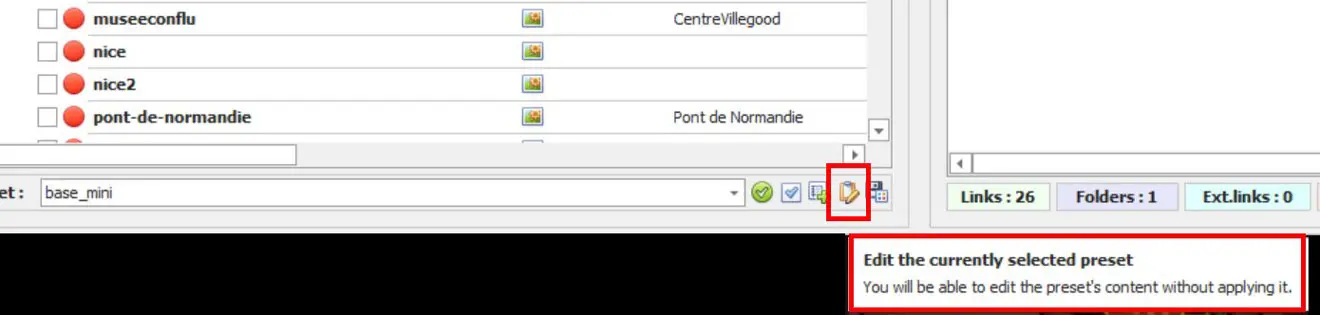
All you have to do is select the elements to add (by passing them to "green") or to remove (by making them red) and click on OK in the update window that opens.
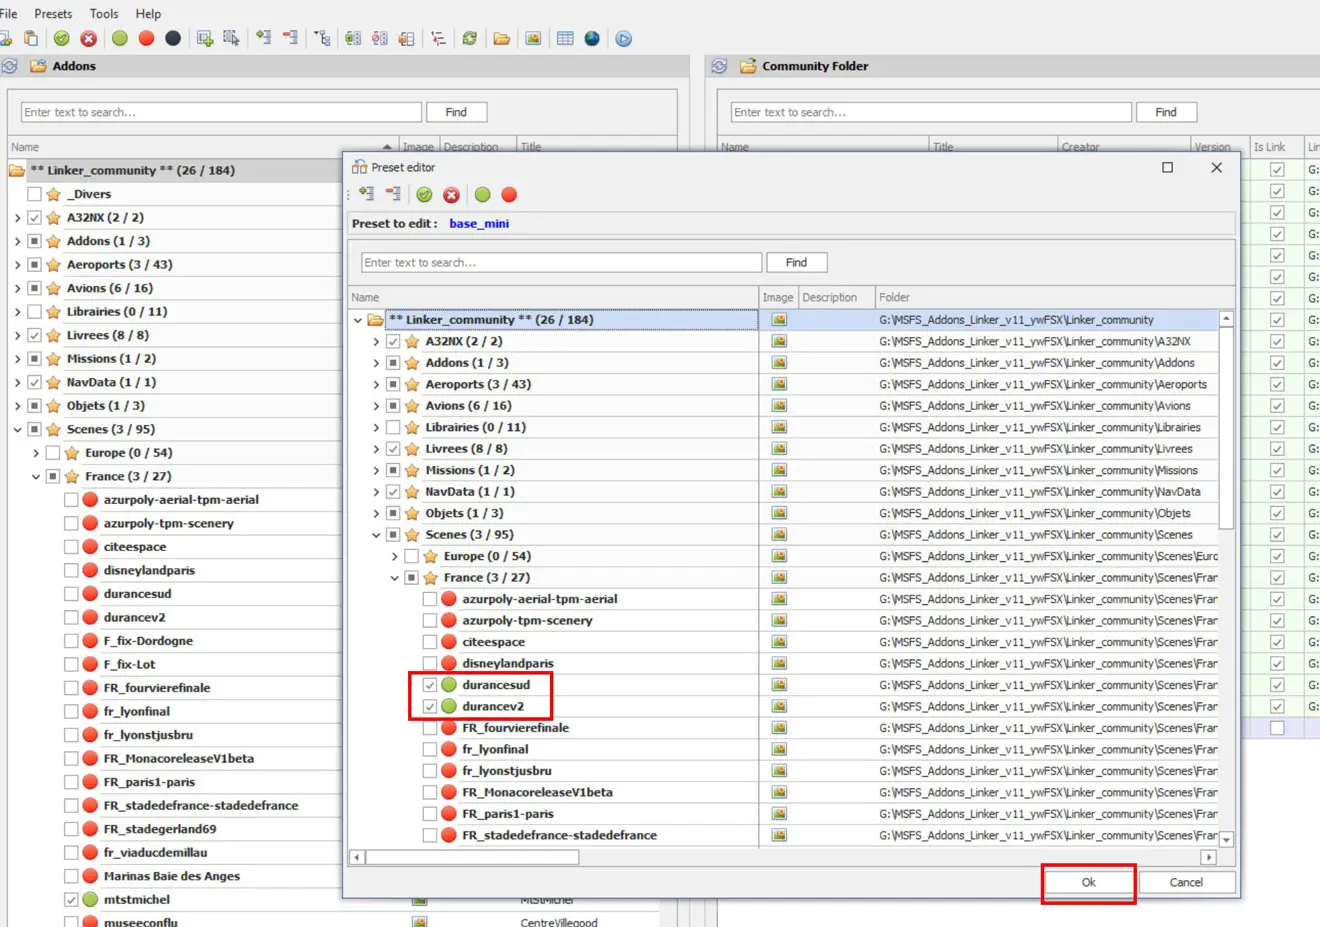
The update will be effective the next time the "preset" is reloaded.
5. Further information
1 - It is possible that by loading your addons folder in Linker you have duplicates: they are indicated as follows:
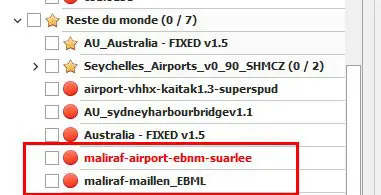
It's not a nuisance, but it's not very "aesthetic".
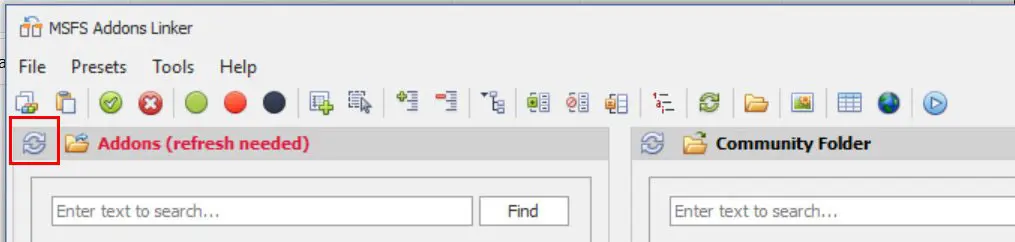
If, when you add new addons in the folder used by Linker, it is already launched, you will be warned by a message and you will have to click on the icon to its left to update (refresh) Linker.
2 - You can view the thumbnails of the addons by hovering the mouse over the icon to the right of the file name.

3 - In the icon bar, you will find 3 specific buttons:

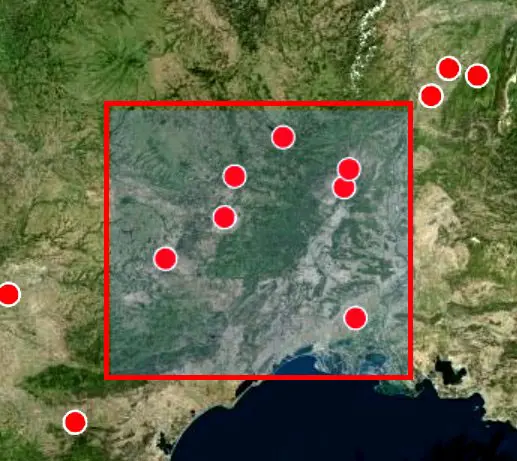
- an "Addons map" button which displays a zoomable map (several base maps) of the scenes and airports contained in the Linker's addons folder
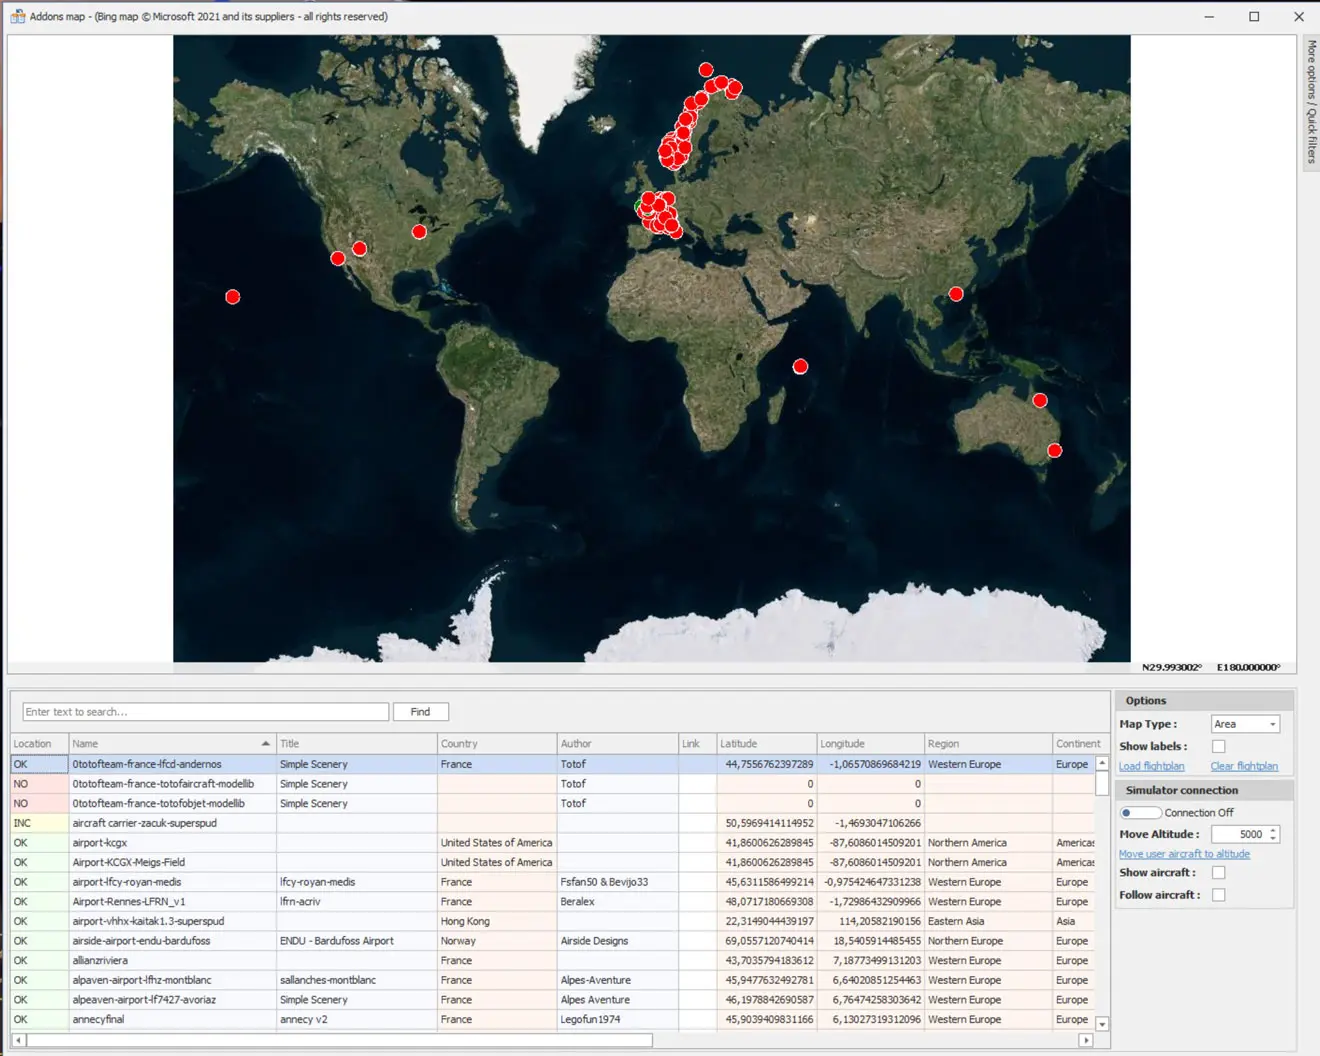
From the map, you can directly select and therefore put in a preset several airports at once. See paragraph "Using the map to update the presets" at the end of the tutorial.
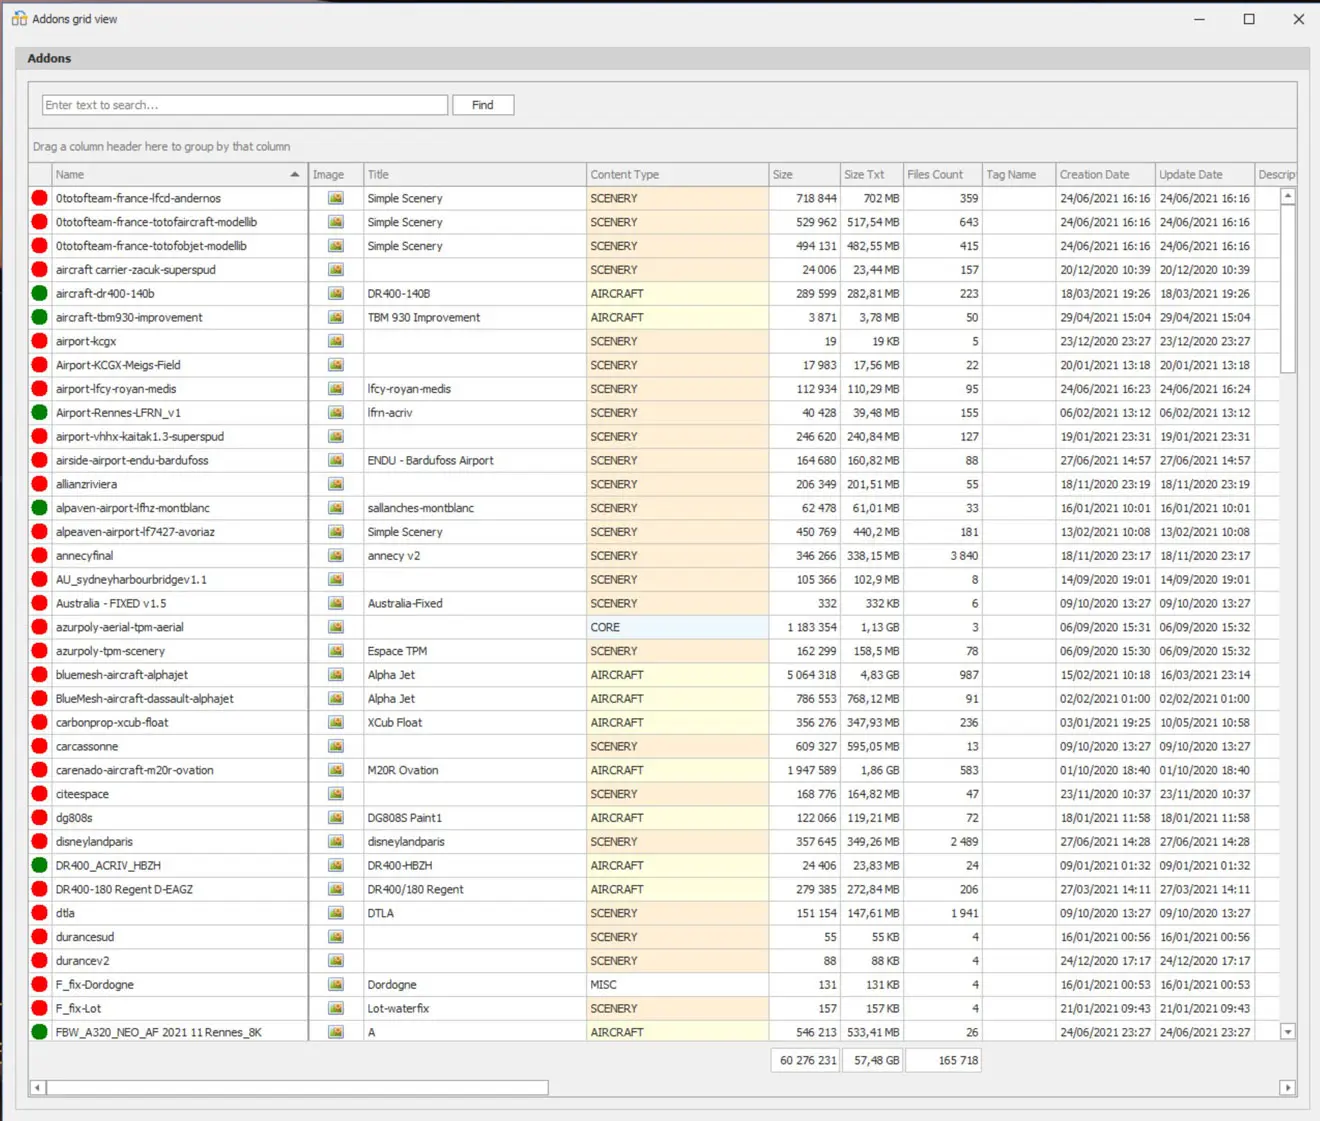
- an "Addons grid view" button which displays a window summarizing all the content of the addons folder with their situation in relation to the current "preset" (red or green circle), their type, size and more.
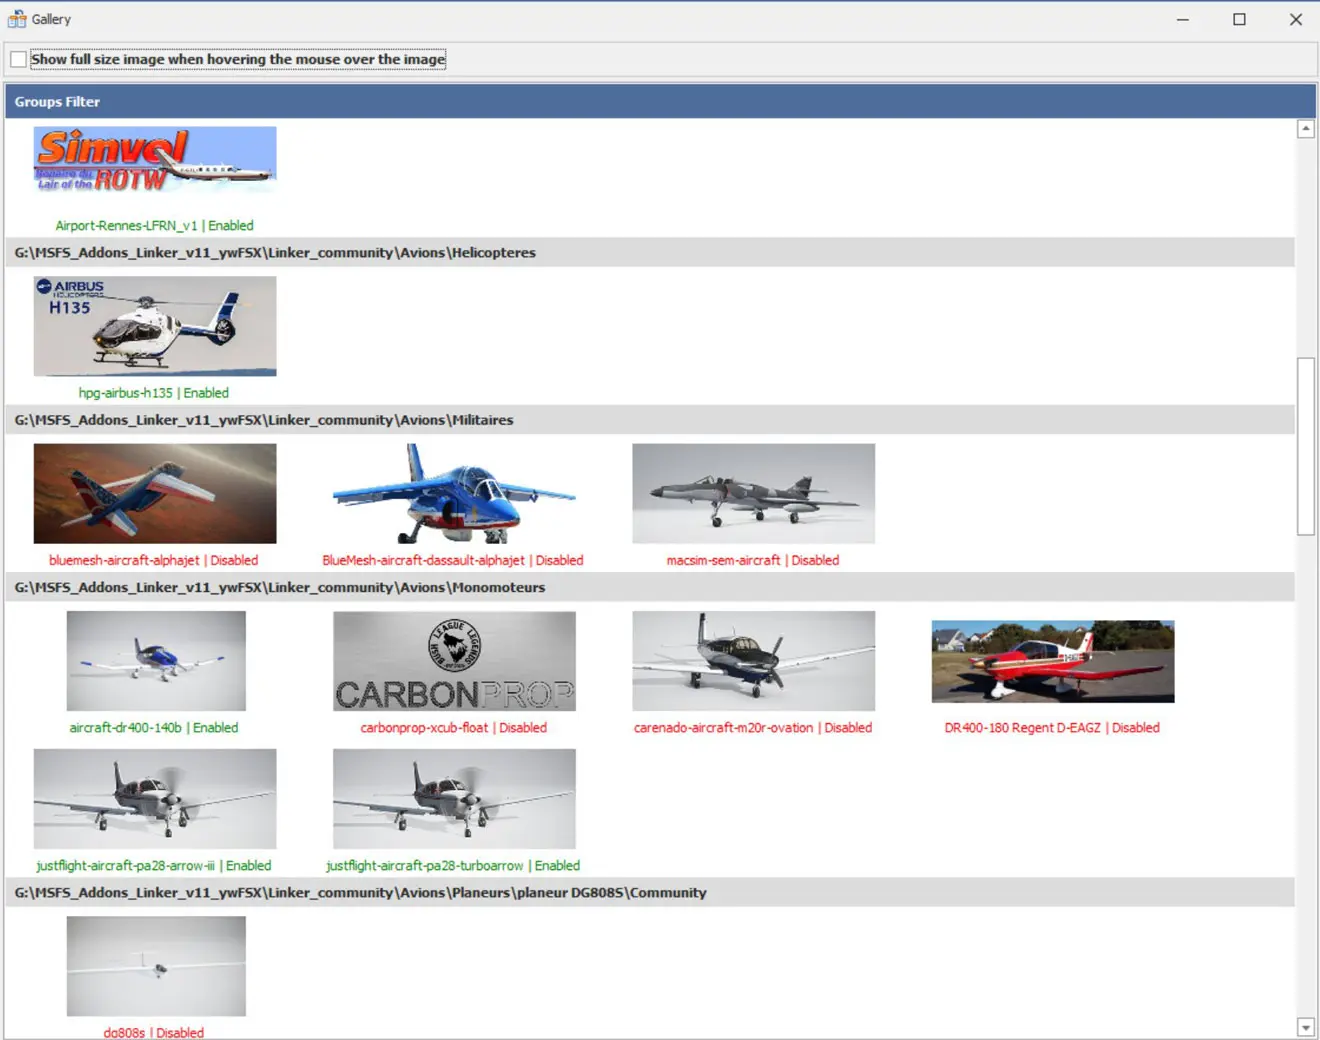
- a " Thumbnails gallery " button which displays a window with all the thumbnails found in the addon files indicating whether or not the file is in Community.
NB: If you modify the Community folder via Linker while FS2020 is running, these modifications cannot be taken into account until the next launch of FS2020.
But nothing prevents to update the folders of Linker with new addons and to create, modify or delete presets when FS2020 is running, this one using the Community found during its launch.
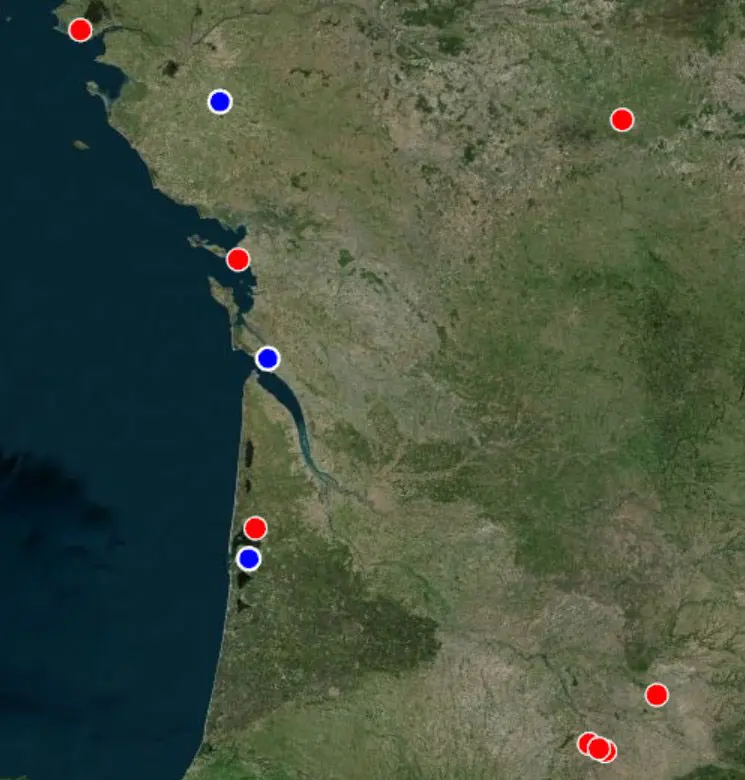
4 - Using the map to update the presets
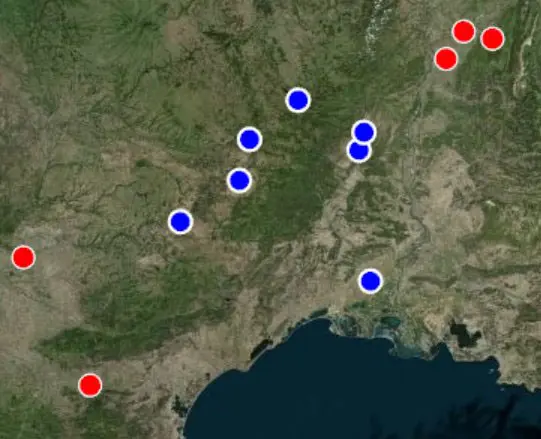
On the map, the green dots are the airports included in the active preset, the red dots are all the others that have not been selected in the active preset.
But, the map also allows you to directly select the airports of your choice and install them in the current preset.
Example with dispersed aerodromes
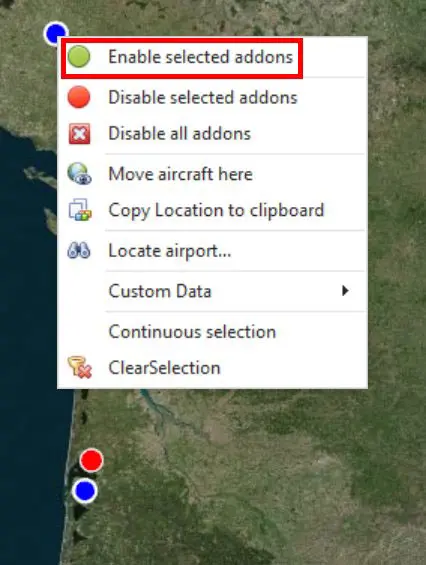
1 - with the Ctrl key pressed, each clicked red point turns blue.
2 - on one of the blue points, a right click of the mouse to display the actions menu and click on "Enable selected addons".
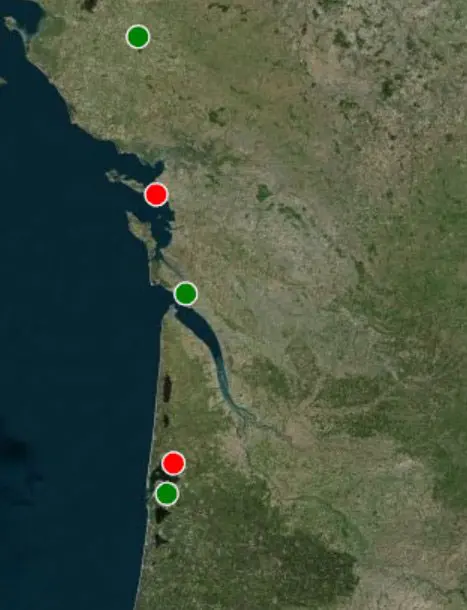
3 - the dots turn green and are inserted into the current preset.
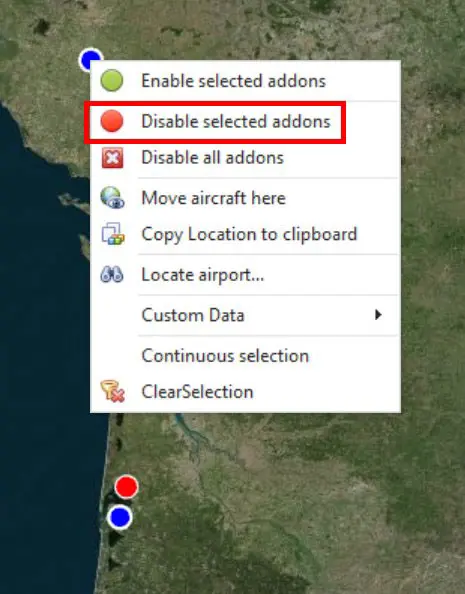
4 - If you want to deselect airports, the technique is the same, you pass the dots in blue and you just have to, in the menu, click on "Disable selected addons" on one of the dots in blue.
5 - If the points to be selected are grouped, the same operations can be carried out by selecting them with the Shift key held down (classic Windows function).