A320 Fenix: Create special waypoints
The Fenix A320 can manage special waypoints (WP) such as:
- "Time" WP
- WP by geographical coordinates
- The WP by "2 radials from 2 WP"
- WP by "radial/distance from another WP"
- WP within a certain distance of another WP included in the FPL
1. Creation and visualization of a "time" waypoint
On the ND, when the flight plan is active and controlled by the PA, we find all the waypoints created by the flight plan (officials and users).
It can be interesting to visualize where your plane will be on the ND according to a given time (on a long leg for example). It's doable through the MCDU and it's very simple.
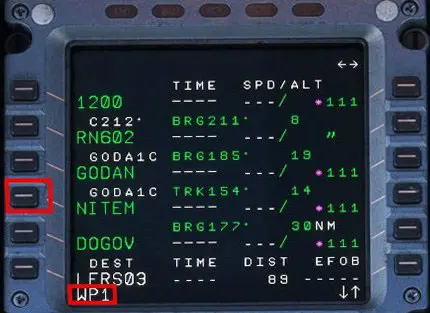
In the MCDU, we enter in the scratchpad a time value in HHMM form and we click on a button to the left of any waypoint:
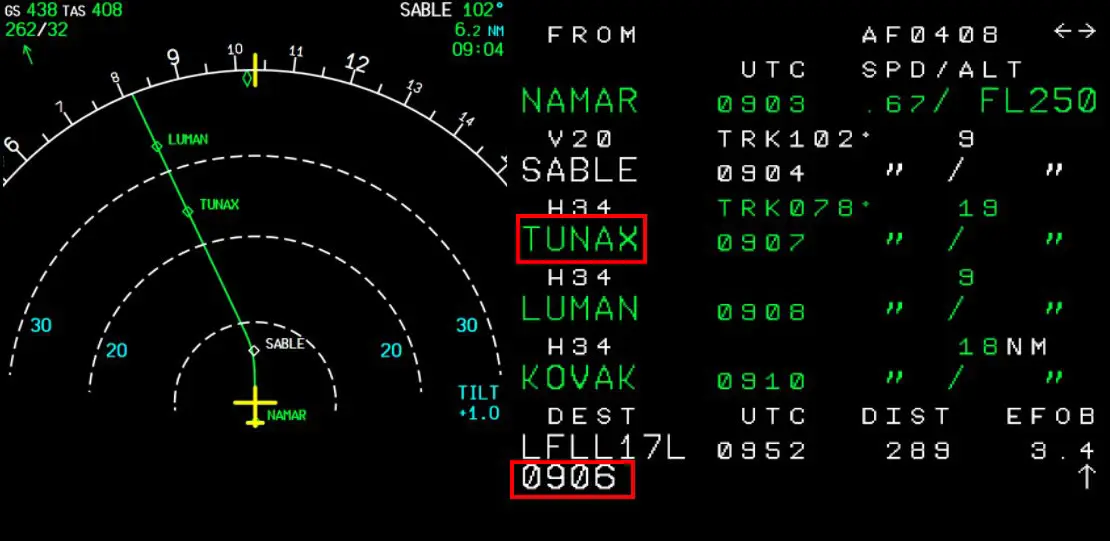
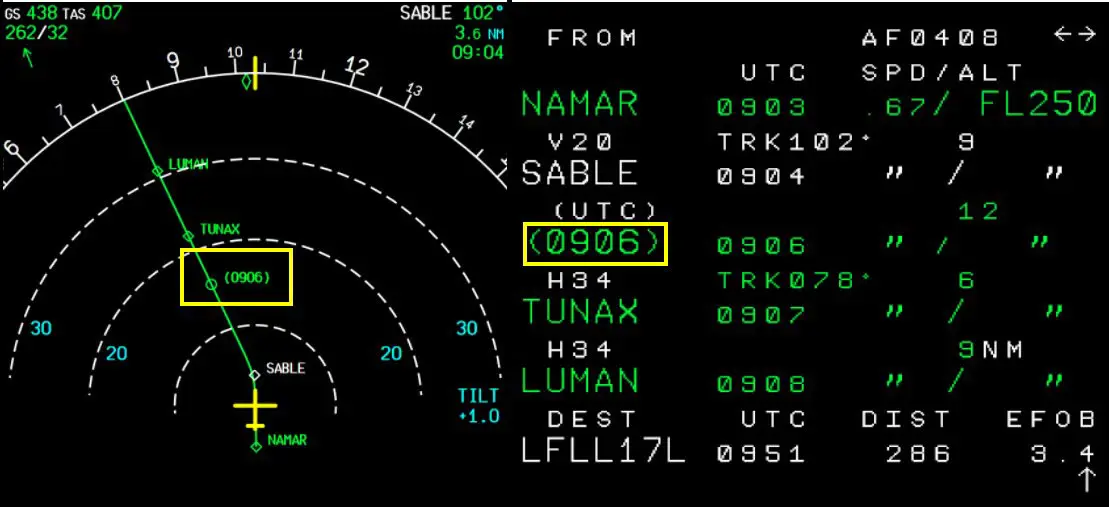
The "time" waypoint is displayed in its place both in the MCDU and on the ND (in parentheses to clearly distinguish it)
It is thus possible to stake out its flight plan with passage signals at a determined time.
Of course it is just as easy to delete these time WP:
We press the "CLR" key so that it appears in the scratchpad and we click on the button to the right of the WP to be deleted.
Result: the flight plan is back to its original version.
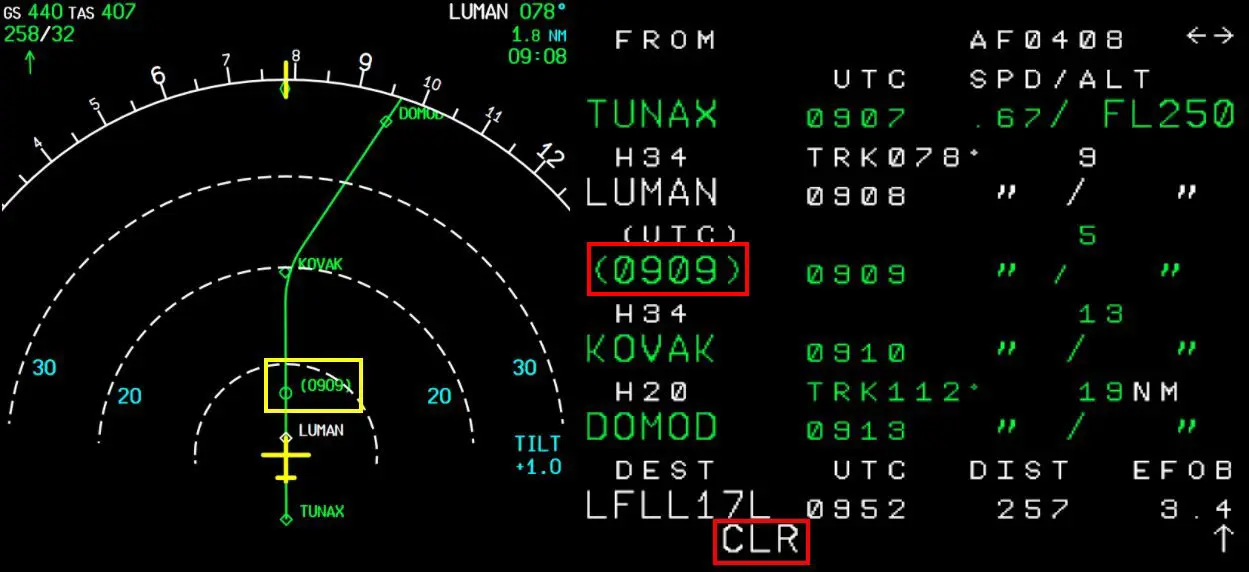
A concrete use case: You are in flight to a destination and in the documentation concerning the country you read that you are asked to identify yourself using your VHF2, 20 min before the point of entry into this country.
By "scrolling" the flight plan in the MCDU, you see that you will pass the entry point at 1307. You then only need to insert a time marker at 1247 and contact control, as requested, passing this point.
2. Creation and visualization of a waypoint by its coordinates
This type of waypoint creation is already explained in the tutorial on creation of WP with LNM (French). We repeat the essentials here (without the part describing the format of the coordinates).
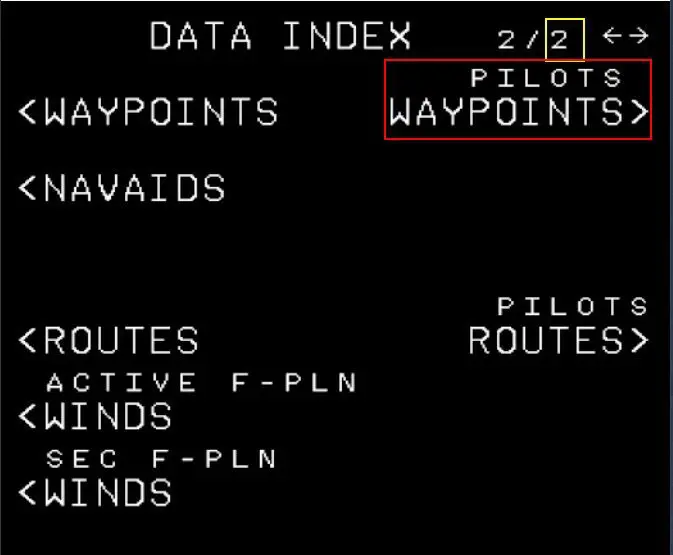
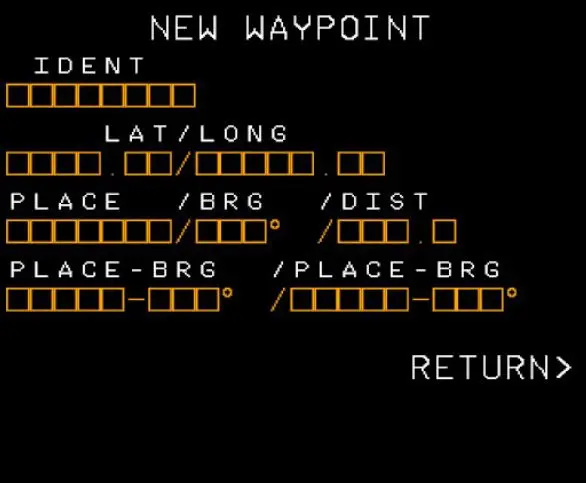
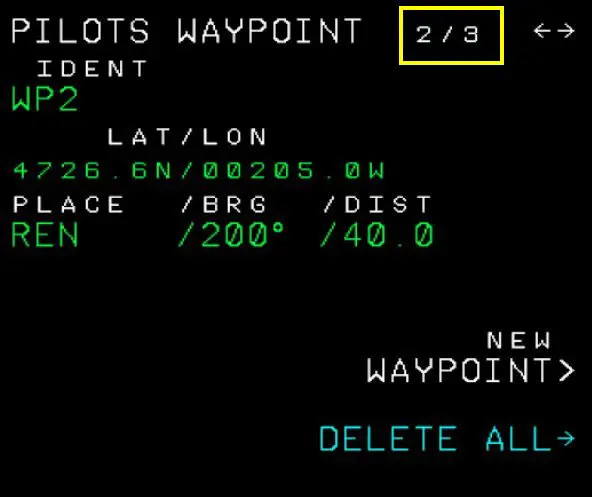
In the MCDU, click on the DATA button then on the right arrow to access page 2. On this page, click on the "PILOTS WAYPOINTS" button:
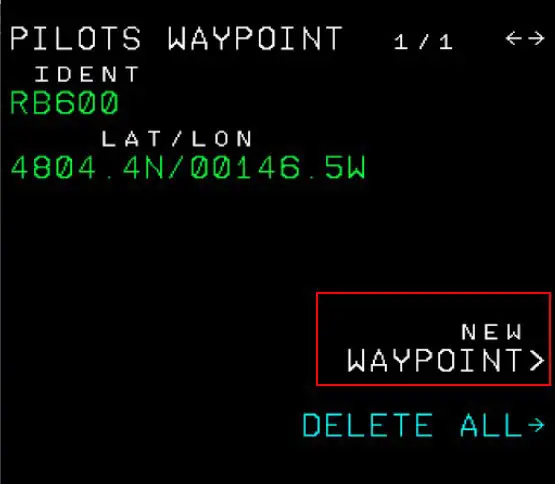
If a waypoint has already been entered (as in the image above), it is displayed. To enter a new waypoint, click on the "NEW WAYPOINT" button and enter its name and coordinates:

3. Creation and visualization of a waypoint defined by 2 radials
This WP will be at the intersection of 2 radials which pass through two WPs already in the flight plan.
Example:
LFRN-LFRS flight, creation of a WP on the following radials:
VOR REN, radial 230°
VOR NTS, radial 300°
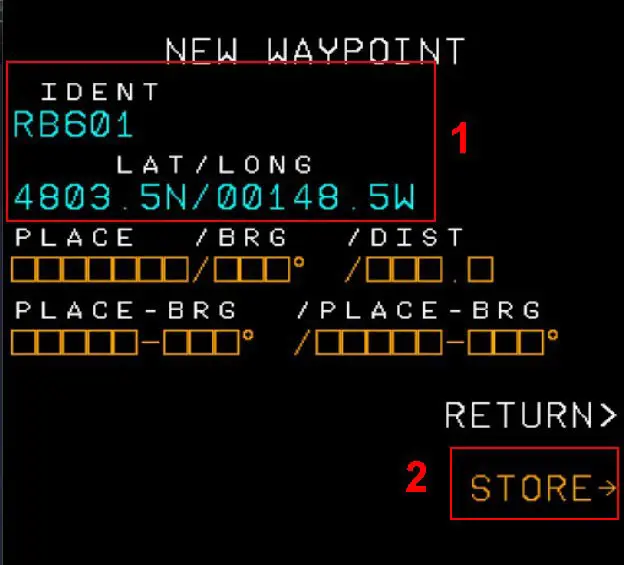
As for the previous WP, you must connect to the DATA 2 page of the MCDU to enter a new WP. Once the WP IDENT is completed, it is the 3rd line that must be completed as shown in the following image in the red frame.
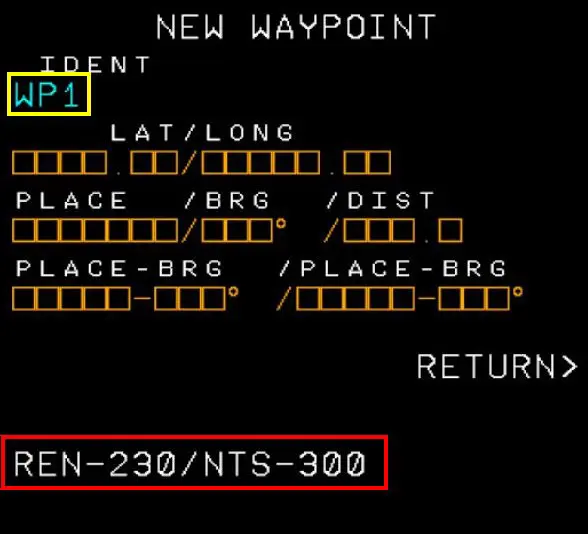
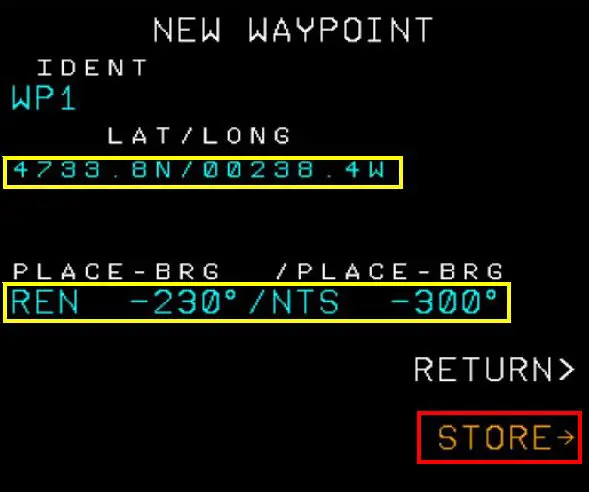
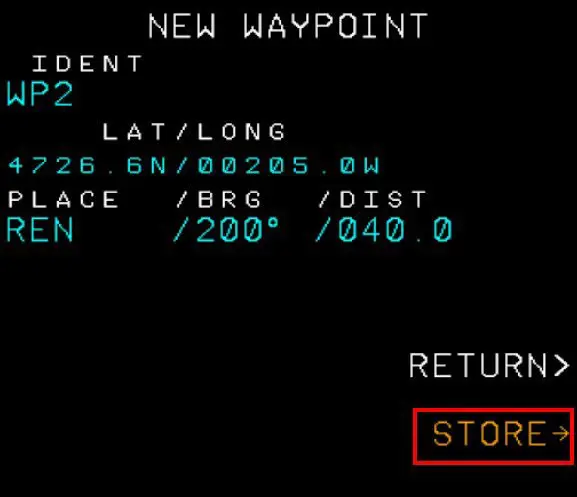
The WP is created, all that remains is to save it in the "pilot" WP database of the MCDU with the STORE button.
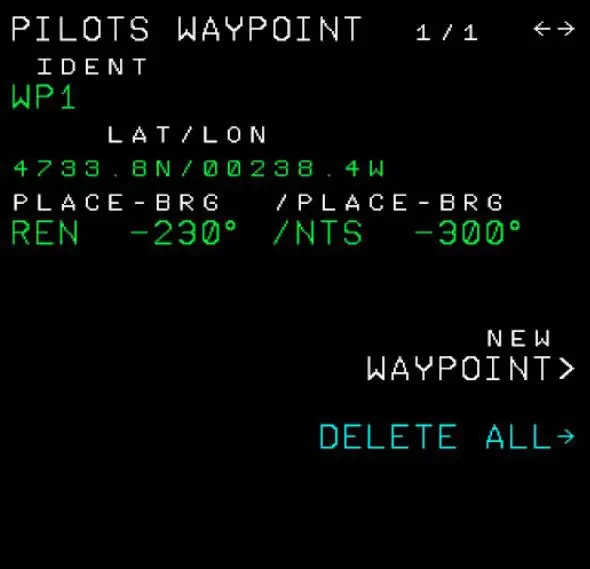
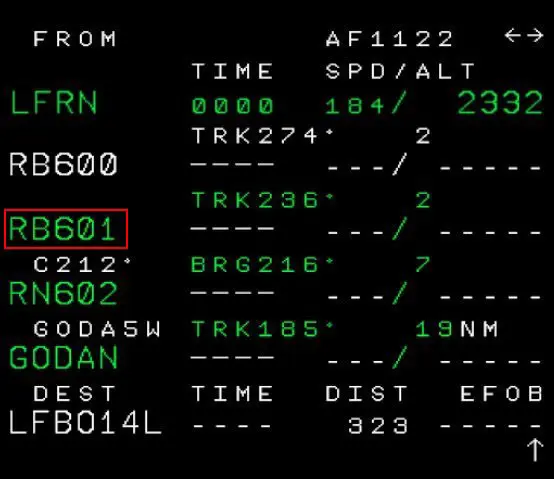
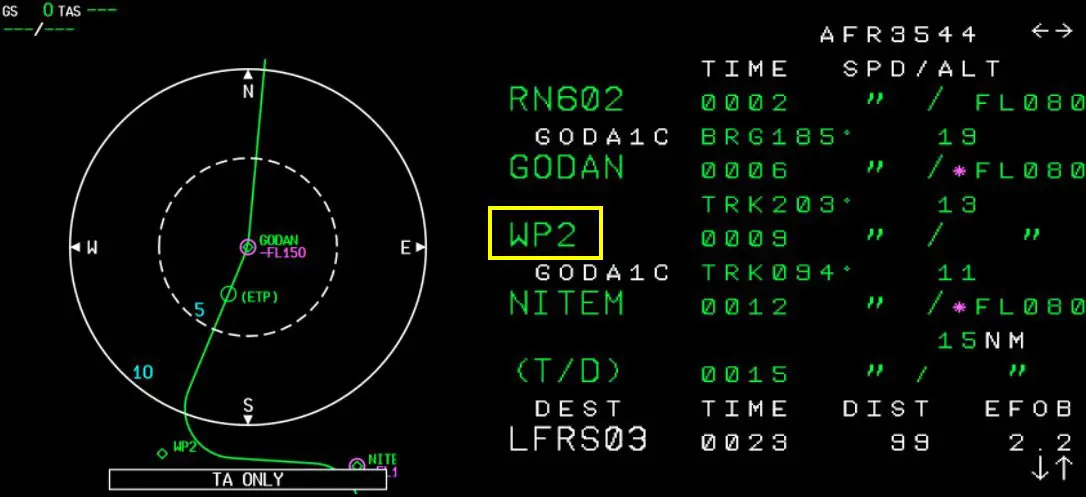
You must then integrate the waypoint (WP1) into the flight plan by entering it in the MCDU's scratchpad and clicking on the waypoint in front of which it will be placed (NITEM). Then remove (CLR) the discontinuity that was added.

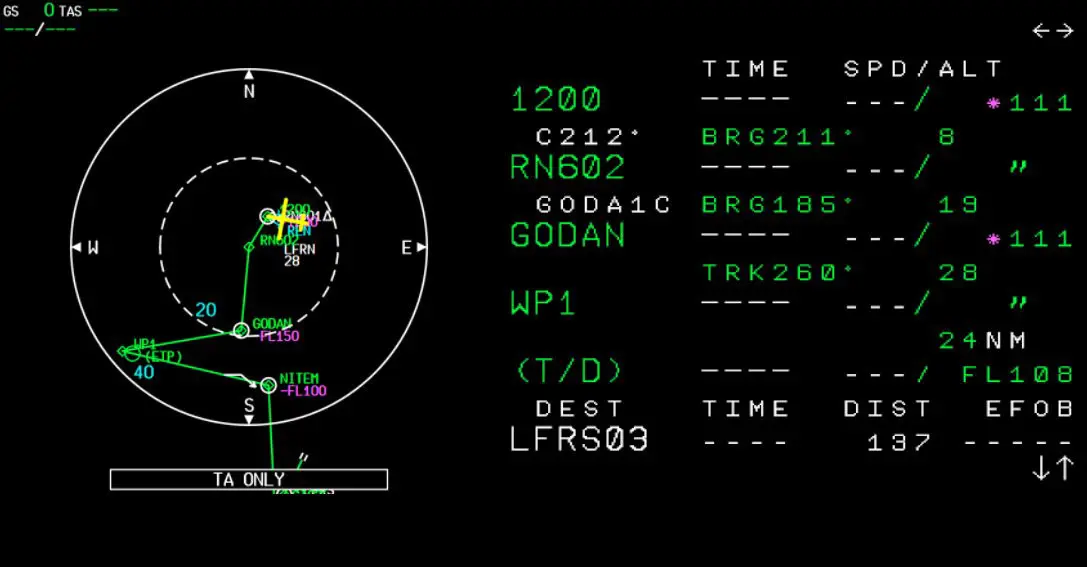
On the ND, in "PLAN" mode, you can view the new WP (WP1 is an arbitrary WP just created for the example)
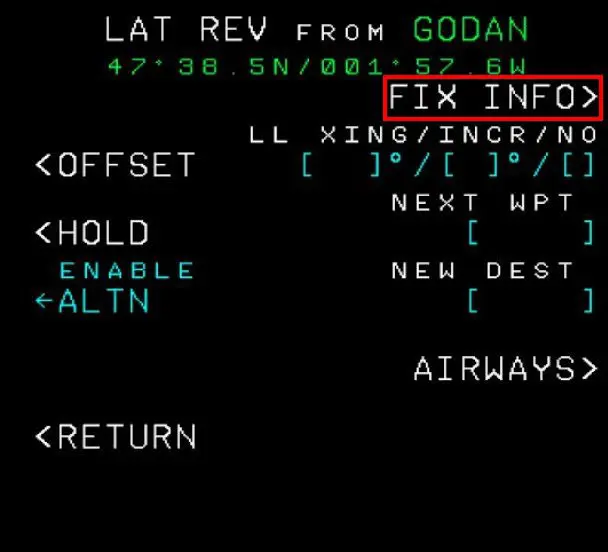
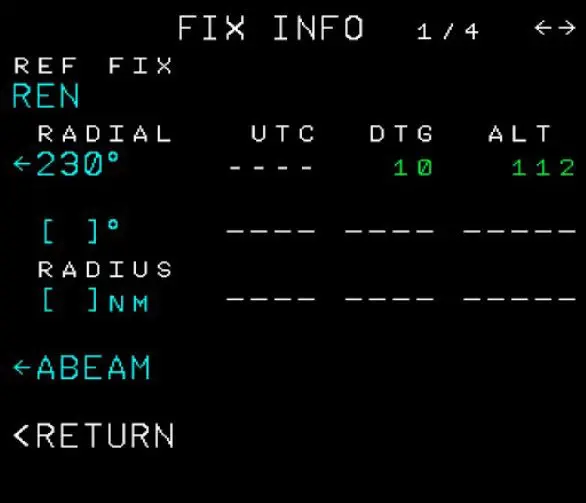
With the "FIX INFO" option (obtained by clicking on the created point, here WP1) we will be able to view the two radials (name of the original WP and Radial) which will therefore intersect at the generated WP.
(NB: FIX-INFO will be the subject of a dedicated tutorial)
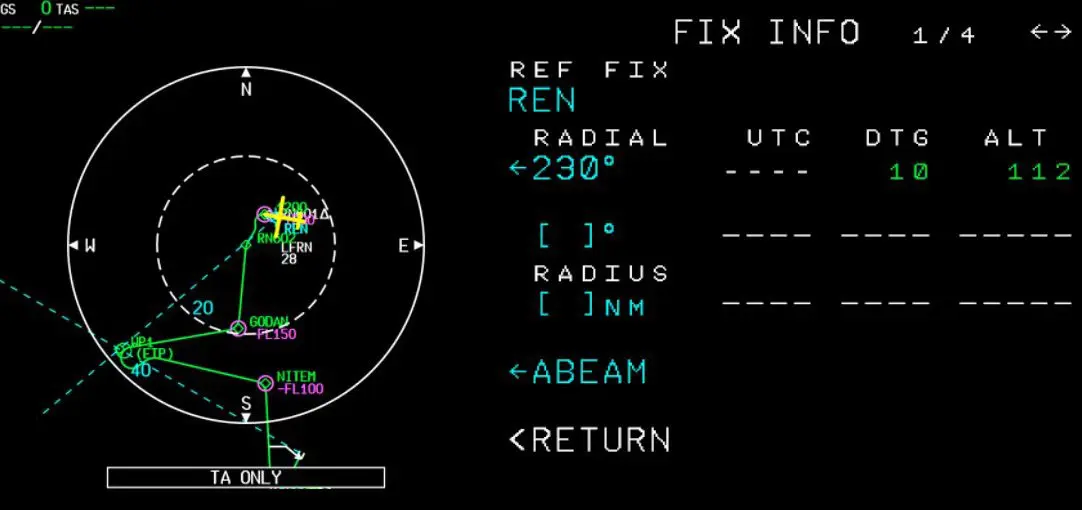
Concrete case: at the request of air traffic control, creation of a waiting loop outside the normal circuit, i.e. in our example:
4. Creation and visualization of a waypoint defined by a radial and a distance
We return to the DATA 2/PILOTS WAYPOINT/NEWWAYPOINT page as in the previous examples. This time, line 2 below the WP2 IDENT will be used.
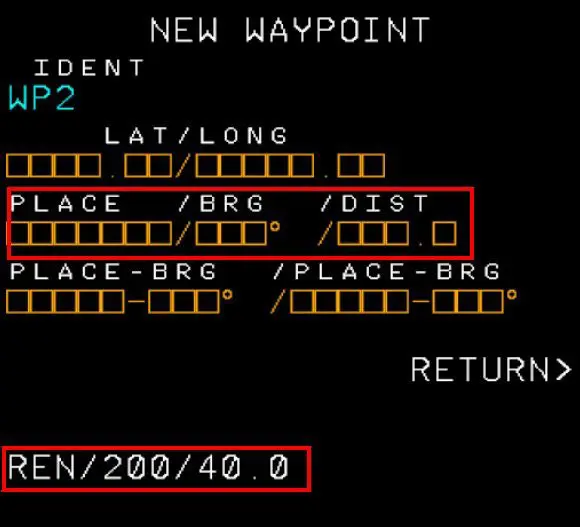
NB: there is one page per WP created (number in the box surrounded by yellow), accessible with the arrows of the MCDU keyboard.
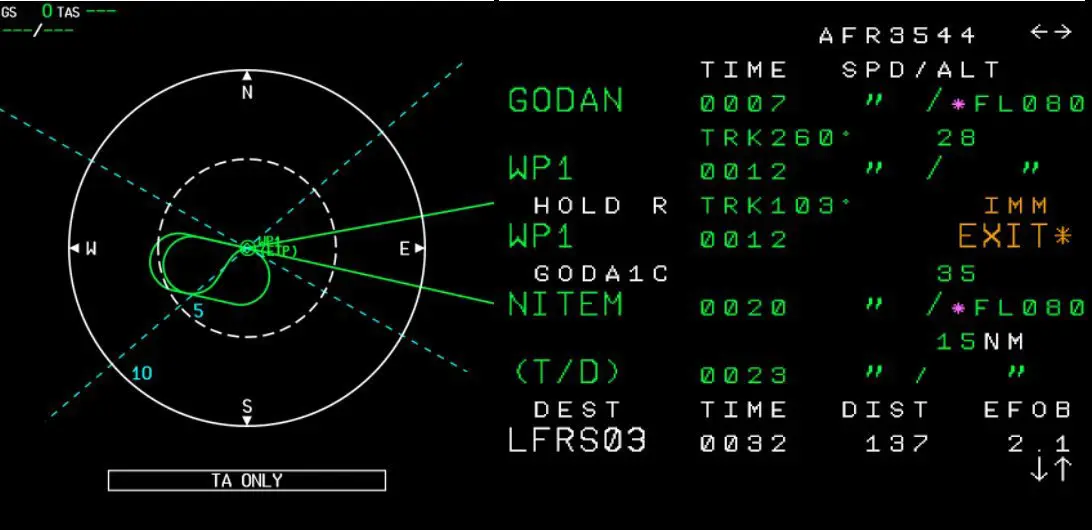
As in the previous case, you must then insert the WP (WP2) into the flight plan via the scratchpad and place it by clicking on the point it precedes (NITEM) then remove any discontinuity which gives the image of the n/a and from the MCDU below.
5. Creation of a waypoint defined by a distance from another WP of the FPL
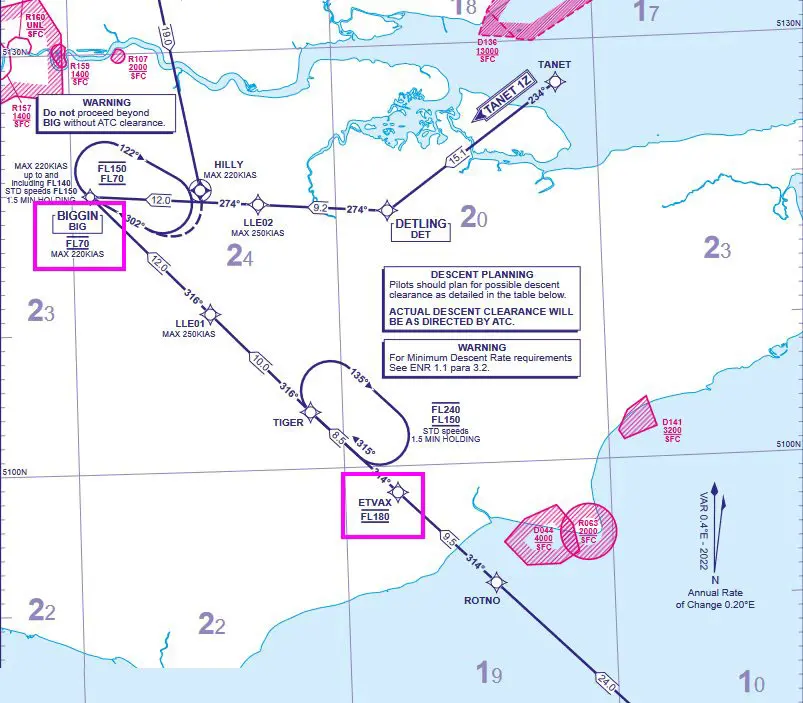
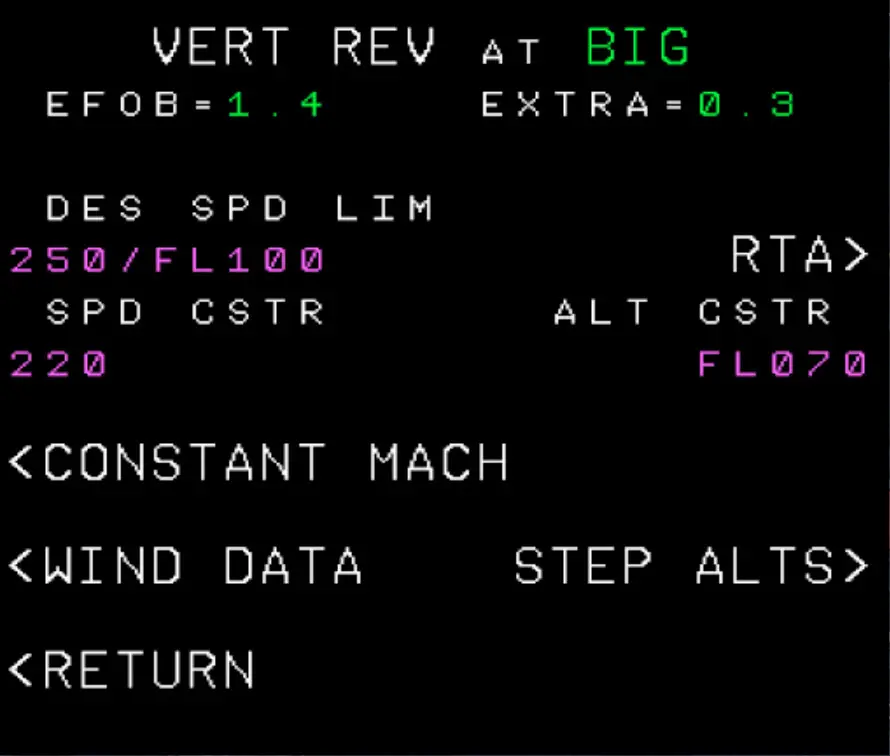
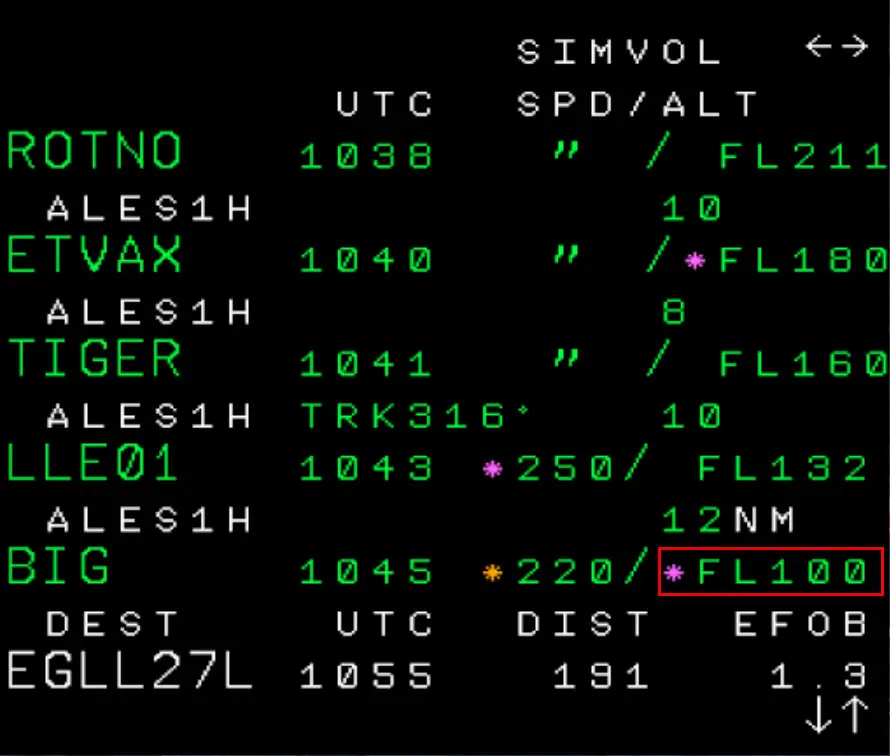
Concrete case: you are en route at FL240 to London Heathrow, on an ALESO arrival and ATC contacts you and says: "Descend at your own discretion to be at FL100 at BIG. Arrange your descent to cross FL180, 10 NM before TIGER"
(NB: This is a fictitious situation. Looking at the ALESO arrival sheet, it can be noted that it is requested to be at BIG at FL70 and to be at ETVAX at FL180... and that the FM is already coded to respect these constraints)
Three pieces of information are important in this radio message:
- Must be level 100 to BIG,
- You have to pass FL180, 10 NM before TIGER,
- We decide when we will begin our descent.
We will therefore use the FM to comply with these 3 instructions.
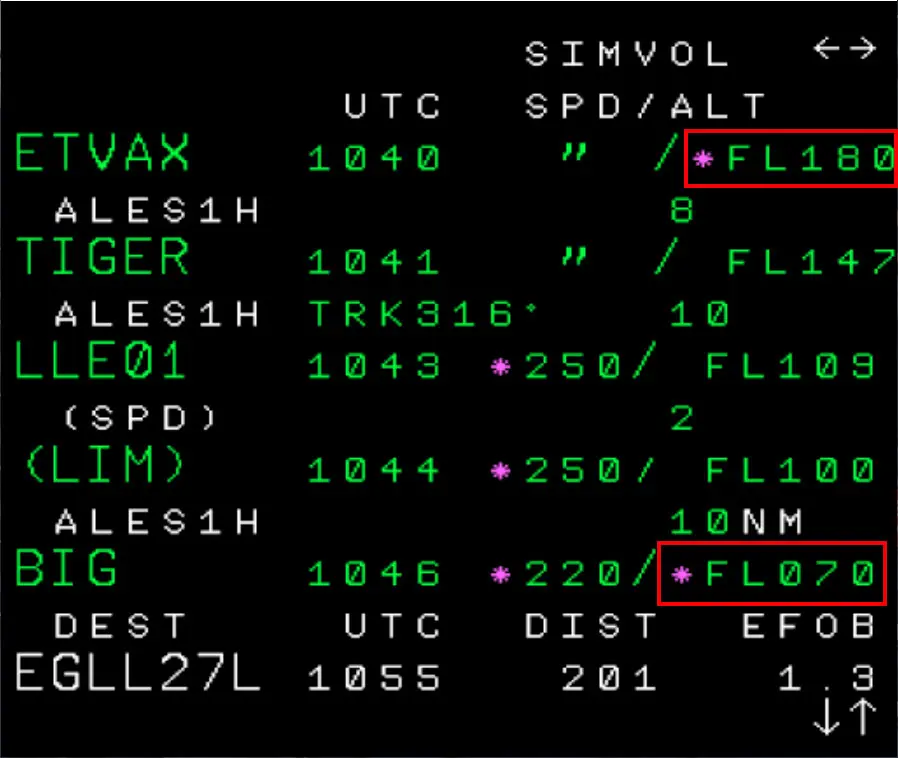
In the F-PLN page, we will first change the default constraint at FL70 to a constraint at FL100.
After clicking on the right key opposite the BIG line:
Inserting constraint 100 in the scratchpad:

Then insert at the corresponding line in the page:
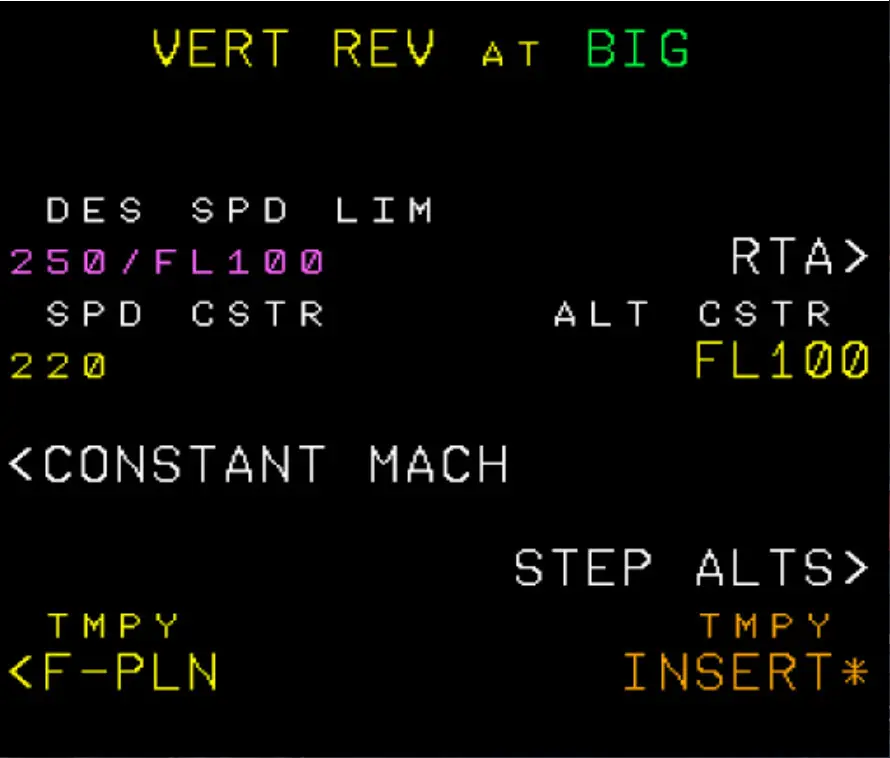
Then validation by pressing TMPY INSERT. The new constraint is well taken into account.
To reach FL180 at 10NM before TIGER, a new point will have to be created. This will be done by typing in the scratchpad the following sequence TIGER/-10:
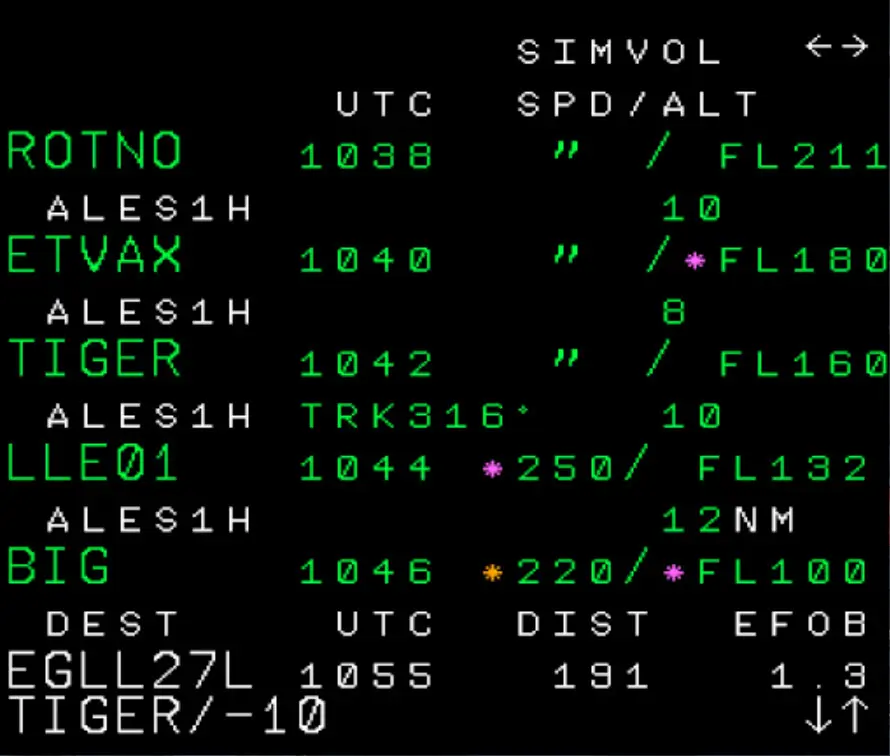
Then by clicking on the button on the left opposite the TIGER line:
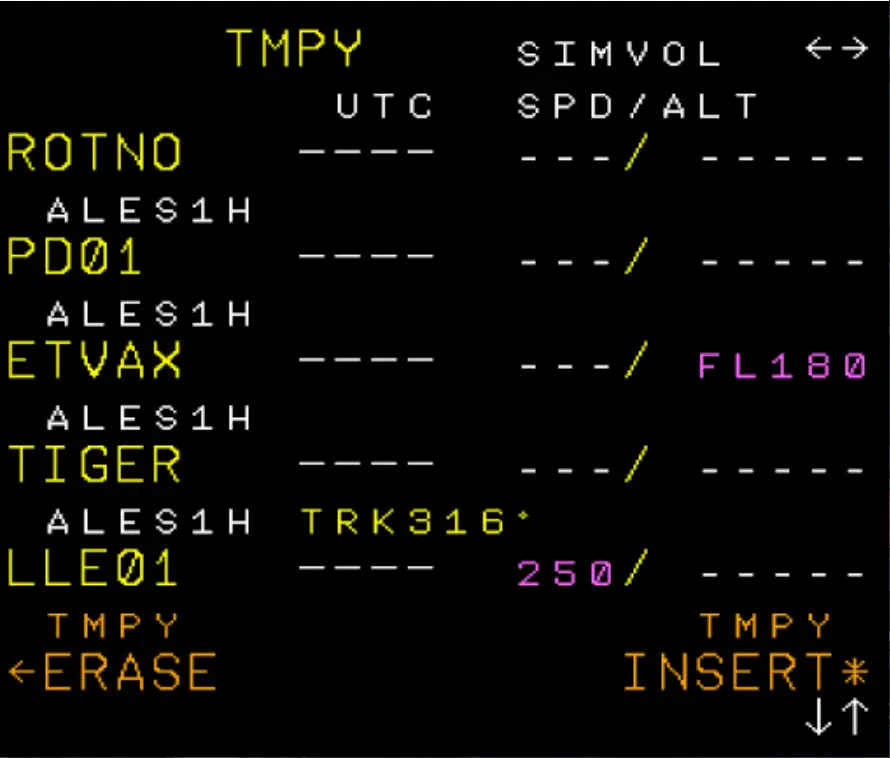
This creates a point PD01 (above the ETVAX line - which is normal because ETVAX is 8.5 NM from TIGER [see ALKESO approach chart above] so a point 10 NM before TGER will be well before ETVAX [1.5 NM before]).
The insertion is validated by pressing the TMPY INSERT key.
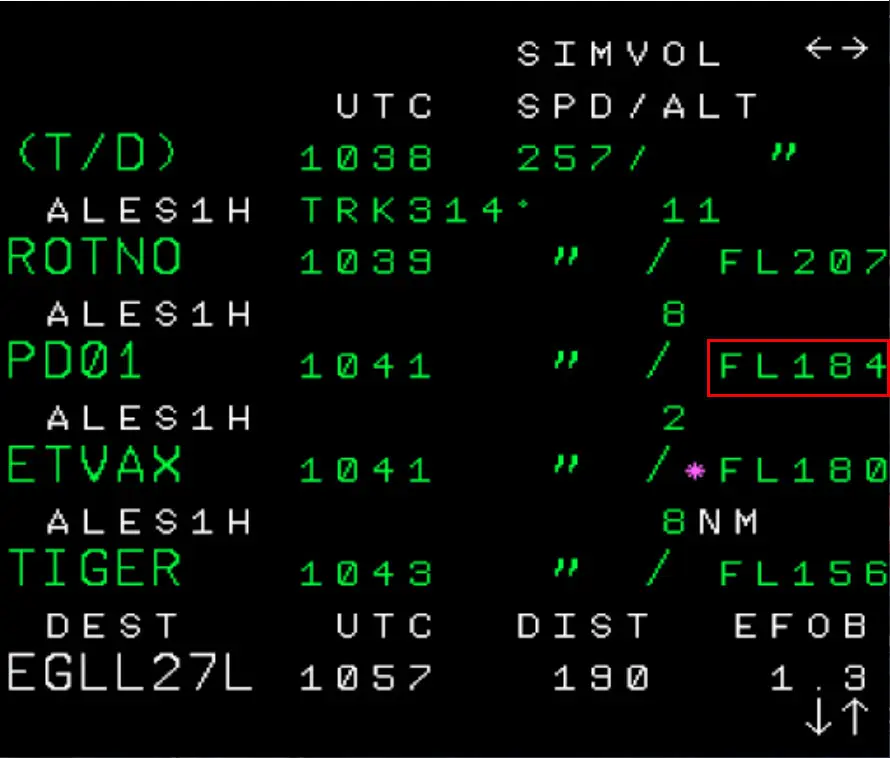
If we "let the plane do it", we would pass the point in question in descent at FL184.
It therefore only remains to transform this constraint into a constraint at FL180 in the same way as the constraint at BIG was modified,
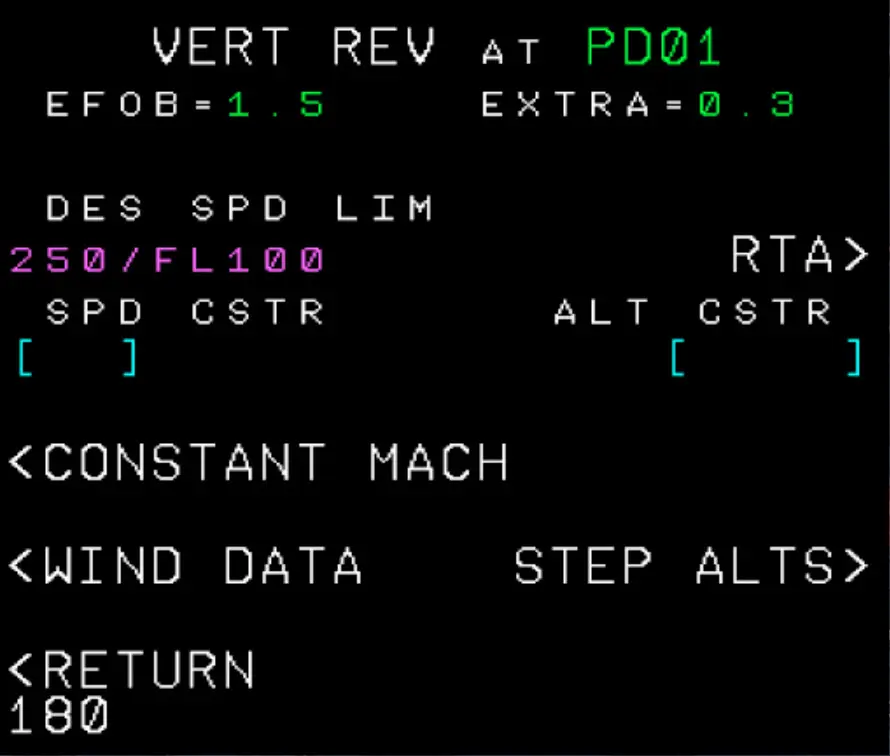
to get the following result:
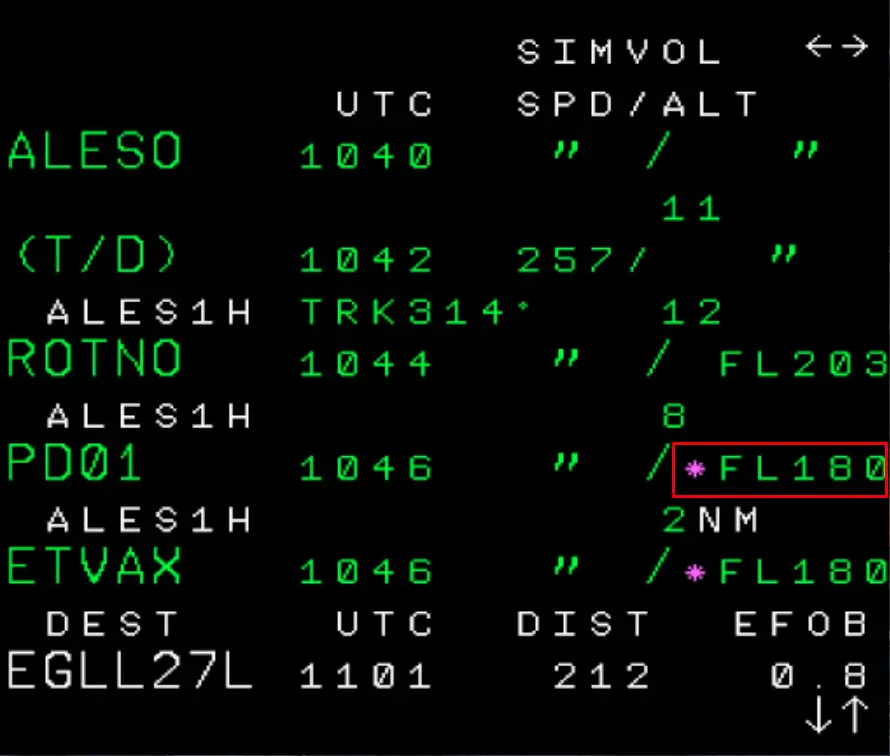
(Reminder: the magenta star in front of the FL180 indication reminds that this is a constraint).
Once the two new constraints requested by the control have been inserted, the FM will calculate a new descent start point (T/D). Just before passing this point, the FL100 will be displayed on the FCU then the button will be pushed (DESC mode).